Showing posts with label cottage windows. Show all posts

Friday, August 7, 2015

Tall Garden Cottage Tutorial

This month I have a pretty big tutorial to share.
There are loads of steps and it'll take some time to complete (especially when you factor in drying time), but I think it's worth it.
Created from Gina's 3 Story House, you could customize the contents to your own whims and tastes. Filled with little mementos, keepsakes and small photos it would make a wonderful gift for someone special.

Mine isn't quite so sentimental and will be home to little gnome and elf figures and collectibles :)


Don't feel rushed with this project. Enjoy the process of making it 'just-so' and the challenge of filling it with lovely little bits and bobs.


You can find the full video tutorial HERE. If you have any questions or are unclear about anything, don't hesitate to ask.

Gina's Supply List:

Other Supplies:
White Tacky Glue
Spackling (I used one that goes on pink and dries white)

Thursday, November 13, 2014

Diorama in a Winter Theme by Nancy and Lavender Layout by Melissa

Today we have two beautiful projects to share with you. First up is Nancy with our new diorama!

This Diorama is one of the newer selections in our store, and it's my new favorite piece to work with.  The possibilities are endless for decorating in any theme you like.  This is a large piece at 5" wide, 5"deep and around 7" tall.  When assembled, the Diorama provides a spacious  triangular shaped niche on each of the four sides for you to decorate.  The top of the piece also provides a really large space.   This piece also comes with a lazy susan pedestal to attach to the bottom so it will turn.  I chose not to use the rotating base and opted to add some Tim Holtz feet instead.  I wanted my creation to have a wintery vintage Victorian feel, and I thought that the ornate feet best reflected the look I was after.  


After I assembled the piece, I gave it a light coat of gesso.  I papered the inside of the niches with canvas resist by Prima Finnabair Elementals in a music note pattern.  I needed two sheets and had scraps left over.  I stenciled over the canvas using a snowflake stencil,  first with Prima Chalk Ink in Old Rose, and then I used the same snowflake stencil with sparkle texture paste.  I added some gesso with a dry fan shaped brush here and there to distress. 

I covered the vertical framework of the piece with crackle texture paste, and distressed it with some gesso and a little light pink acrylic paint, and a little buttermilk acrylic paint.  The horizontal framework was covered with a sequined eyelash trim I got on ebay and had been hoarding.

The chipboard shapes were embossed with Stampendous shabby embossing powders in cream and in white.

The Victorian winter images were mostly freebies I found on Pinterest, along with a collage sheet from Gecko Galz called Christmas Icons.

Thanks for looking!

Gina's Designs Products Used:


Next up, we have Melissa with a gorgeous layout.

Hi everyone! Melissa here with a 12 x 12 mixed media layout for Gina's Chipboard Laser Designs.

I found the flourishes, leaves, and butterflies both beautiful, and a pleasure to work with. With their delicate shapes, I think they complement the vintage photo perfectly.

To decorate the chipboard, I first prepped them with gesso. The purple flourishes and butterfly were painted with Twinkling H20's . After they dried I quickly smeared on diamond stickles with my finger.  While it was wet, I dabbed on Pearlex Powder. I added silver stickles and bling on the butterfly.  The gold flourishes are gold ink brushed on. The green leaves are chalk ink with "veins" scratched on with a straight pin. The little flower by the lower right of photo is greenish blue pigment paint, Lindy's spray, then purple chalk ink dabbed on with a small piece of cosmetic sponge.


Thanks for looking!
                                                                              
Gina's Chipboard used:
Mini Flourishes Bella
Flourished Frame Bella
Scribble Frames Butterfly
Scribble Frames Hearts & Flowers


Other:
Watercolor Paper
Prima and Petaloo flowers
Jaquard Pearlex Powder in pearl
Jolees bling, and a few Swarovski crystals on the butterfly
Twinkling H20 Watercolors
Winton and Lewis Watercolors
Vintaj bead cap
Tresors De Luxe lace
Plaid Liquid Leaf Gold Paint
Tim Holtz Rub Ons
Distress Crackle Paint - Clear Rock Candy
Lindy's Spray
Versacolor Ultimate Pigment Ink
VersaMagic Chalk Ink Pad
Tsuineko Chalk Ink
Lindy's Stamp Gang
Viva Modeling Cream


Friday, May 23, 2014

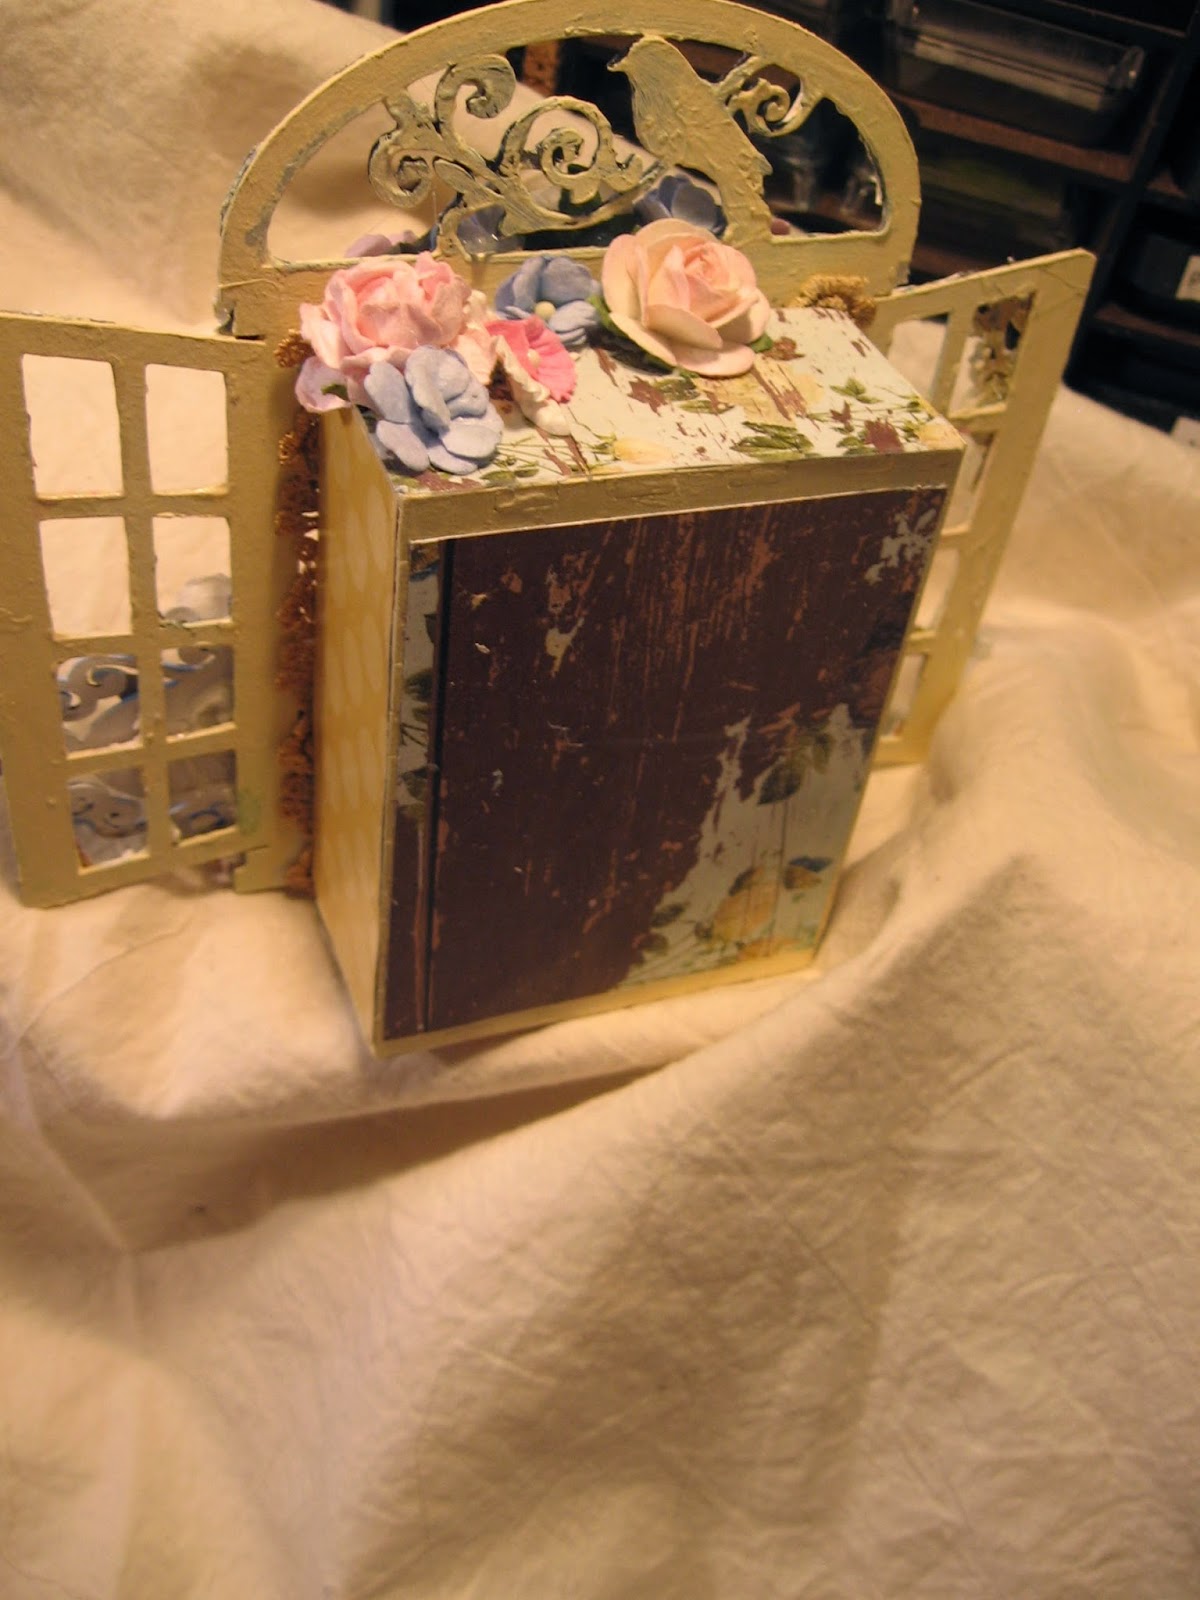
Shabby Cottage Window Shadowboxes


 Happy Friday everyone! Today I would like to share a fun little project I created to hang on my wall in my kitchen. These are my Shabby Cottage Window Shadowboxes, which are made from Gina's Bagatelle Boxes.

 I really love these little bagatelle boxes, they come in lots of different sizes, and you can purchase them in a set of 12! I had a lot of fun with these, and got out the Large Cottage Windows to place over the top of the boxes to create the illusion of looking in a cottage window. I did a lot of mixed media work on the windows, and it was fun to get my hands dirty!

You can see in the first one, several of Gina's other pieces, such as the postage stamp frames, gears, diamond texture sheet, stackable labels set, and a few pieces from the spring shape set as well. I embossed, painted and stamped on most of them and of course added some laces for a finishing touch.


Side & Back View of the Bagatelle Boxes


Thanks so much for stopping by to take a look at my shadowboxes and I hope you will give them a try!

Gina's Designs Products Used

Other Items Used
My Minds Eye Pretty Things Paper
Wild Orchid Craft Flowers
Americana Baby Blue, Buttermilk and Snow Paint
Stampendous Shabby White Embossing Powder
Lace From The Lace Mama
Shimmerz Texturez & Dazzlerz Paints
Wood Embellishements and Lace From My Stash
Wood Dressform by WhichCraft


Monday, March 24, 2014

Spring Fairies Bird House by Veronica and an ATC tray by Deann

First up today is Veronica with a sparkly and glittered altered birdhouse.

Hello again, Veronica here! Today I am sharing an altered birdhouse featuring fairies from Gina's Designs, butterflies from CraftSupplies1, and a new product called Vintage Sparkle Glitter from the scrapbooking store where I work.  I created it as a sample for the store to show the glitter, and first thing that came to my mind was the Garden Fairies from Gina's Designs
I mean what a better combination? Fairies and Glitter!
I was also able to easily use these beautiful butterflies from Craftsupplies1
Gina's Designs really made the project! Her Garden Fairies are a must to have for any garden mystical project.
A beautiful butterfly  from Craftsupplies1 
On top of my magical fairy bird house, I added Dragon Flies  from Gina's Designs, and I love the Vintage Sparkle all over the Dragon Fly.
Here's the back of the Fairy Bird House. I just love how the Garden Fairies Wings from Gina's Designs, just sparkle with glitter! You can also see the Flourish used to decorate the back of the house.
Thank you for stopping by. I loved working on this project, because it made me ready to go out and tackle my own garden for spring planting!


Other Products Used:

Vintage Sparkle Glitter
Ferro Special Effect Paste
Copic Markers
Gesso

Next up is Deann with "Time For Tea", an amazing shabby vintage  ATC display tray

Good morning , I wanted to share a project with you all . I made a Tea themed wall hanging using the 

                                                            Roses in the sugar bowl


 A Tea pot full of roses !

Cottage window with a flower box

Thanks for stopping by! 
(((HUGS)))
Deann

Products used from Gina's Designs-


Saturday, December 28, 2013

Precious by Heidi


 Hello Everyone, Heidi here!  I hope you had a wonderful holiday!  Today I'm sharing a layout using a few fun items from Gina's Designs.  When I got these cottage windows I knew I had to create a page using them.  Although it is far from wintery, or Christmas"ish" I just had to share it today.

The paper is from my stash and is a ruled design but done in pink (of course my favorite color, right?)  I thought it would be ideal for a little girl's picture or a baby picture, which I did not have either of.  I thought against putting my boys pictures in the window.  Ha ha!  
I just love the little sentiments now available at Gina's Designs!

Gina's Designs Products:

Thursday, November 28, 2013

Wood Hanging Mini Album


Happy Thanksgiving! I hope everyone is enjoying the holiday with their friends and family.

Dawn Rene here to share a mini album I made with a dimensional kit from Gina's Designs. It comes with a wooden stand and chipboard pages to make a hanging album. 

This is what the wood in the kit looks like when you get it.
Hanging Wood Album - DDR 1

I used tattered Angels Naturally Aged Fine Wood Paint Kit to stain the wood. I stained the pieces before I put the stand together.
Hanging Wood Album - DDR 2

I covered the chipboard pages with Authentique papers. The pages were decorated with chipboard shapes from Gina's Designs colored with Tim Holtz Distressed Paints or Mister Huey's spray mist. The binder rings in the kit were silver. I colored them with a gold Sharpie marker.

Here are some pictures of the finished product!

Hanging Wood Album - DDR 3

Hanging Wood Album - DDR 4    Hanging Wood Album - DDR 10

Hanging Wood Album - DDR 6   Hanging Wood Album - DDR 7

Hanging Wood Album - DDR 8    Hanging Wood Album - DDR 11
Hanging Wood Album - DDR 9

Thanks for stopping by! Have a safe and happy holiday weekend....

Gina's Designs Supplies
Dimensional Kit: Wood Hanging Stand with Pages
Chipboard Shapes: Small Fence and Gate SetFlourishes 2Words & Phrases 1,10 WordsSkeleton ClocksClock Hands Shape SetCottage Windows MediumCottage Windows SmallFiligree Frames Shape Set

Other Supplies
Paper: Authentique Natural Collection Kit
Dies: Tim Holtz Picture Wheel, Memory Box Fresh Foliage, Memory Box Honey Blossom, Cheery Lynn Designs Hummingbird, Cheery Lynn Designs Burlap Border
Ribbon: Lovebug Creations - Beary Brown
Inks: Tim Holtz Distressed Paints, Mister Huey's Spray Mist
Embellishments: Paper Flowers, Metal Corners, Eyelets, Brads, CTMH Wooden Buttons, CTMH Corrugated Shapes

Monday, November 25, 2013

Nature Inspired Altered Spool with Tutorial

Hi everyone, it's Nancy here today with my favorite project ever!   These spools by Gina's Designs are so much fun to decorate!  They are large spools and there is plenty of room to play with.  I wanted my finished spool to be nature inspired, and the end result was exactly what I'd had in mind.   I have created a step by step photo tutorial and you will find it following the photos of my finished piece.  The tutorial will show you how I created a  simple and dimensional faux bark look to the center of the spool.  I hope you like it!

Here is my finished spool:


Step by step faux bark tutorial:

In step one I have drawn lines of hot glue onto the spool center to simulate a tree pattern.  I grabbed a tree bark rubber stamp from my stash to get an idea of the pattern I would use.  It took just a few moments to draw on the hot glue.  Be sure your glue gun is nice and hot. My glue gun is the fine-tipped variety and I used the high temperature setting.  It took 3 of the fat glue sticks to achieve this.

In step two I painted it with two coats of white gesso followed by gloss enamel paint in light buttermilk.


In step three I used some ink sprays in nature colors to define the raised areas.


In step four I still wanted more definition so I  rubbed on some Lumiere metallics with my finger to further define the raised areas.  I followed that with a clear pearlescent spray for shine


In step five I covered the surface with thick coat of distress crackle paint in clear rock candy


Here is a close-up of the finished product


Although I did not do a tutorial on the rest of the spool, I will show you and explain some of the steps below:

Before attaching the top and bottom disks to the center piece, I first painted the two disks.  I used the same white gesso, followed by the same light buttermilk enamel paint that I used to paint the center of the spool. After the paint was dry I used Kroma Crackle to distress the finish on the disks.  When using Kroma Crackle I do the white glue method in combination as it dries quickly that way.  You can find this white glue method along with other product how-to's for Kroma Crackle HERE.  I purchase my Kroma Crackle at Dick Blick Art Supplies.  It has to be applied thickly for the best results.  I just use my finger to spread the white glue and the Kroma Crackle.  The crackle dries white so I colored it with ink sprays in browns and greens to look mossy like the floor of the forest.  Now it was time to glue the disks to the cylinder. I first sanded the top and bottom edges of the cylinder to insure better contact.  I then glued the top and bottom to the center of the spool with glossy accents.  There is a grove cut into the top and bottom of the disks so that you know exactly where to place  them on the center part.  I squeezed my glossy accents into the grooves.  I placed an item of moderate weight, in my case a ceramic dinner plate on top of the spool until I was sure the glossy accents had dried and that my spool was put together securely.  I then covered all exposed areas of the disks with the same rock candy distress crackle paint that I used on the center piece.


A close up is here


I gave the edges a finished look by hot gluing fibers along the edges of the disks.  I love these fibers, they are very soft and look like moss.  I purchased these fibers on Etsy,  HERE


Now the fun begins!  The next step is to start gluing your embellishments! 

I personally love the look of nature inspired, but I can see this spool decorated in many different ways, and I know I'll be making more.  I have a vision of the spool dripping with pearls and lace in a gorgeous shabby chic style, maybe an elaborate fairy forest, or perhaps a fun and funky steampunk design, or even mermaids in an ocean theme.   Whatever theme you choose, have fun and please share with us on our facebook page.


Gina's Designs Products Used:


Wednesday, July 31, 2013

Garden Fairy Layout by Nancy

Nancy is with us today to share a loving tribute to her sweet kitty Willie who recently passed away:

Hi everyone, it's Nancy here today.  I'm still missing my kitty Willie so much, and I like to imagine that perhaps he flew to heaven on the wings of a fairy.  This layout was created from my heart.  I hope you like it. I have used two of the small fairies from Gina's Designs, and one of the medium fairies as well as one of the large shuttered windows.


The fairies were painted with clear gesso followed by Twinkling H20's in a gold tone, then dotted with some glossy accents.  I covered the wings with glossy accents then gold glass microbeads.  The steampunk doily is new at Gina's Designs and should be in the shop soon.


I used some Prima resin embellishments to represent the rainbow bridge, and more doilies.  I used a damask stencil on the background paper and also dotted it with glossy accents.


The bricks are also new at Gina's Designs.  The window was dry brushed with gesso and acrylic paint in pastel colors followed by Grecian Gold rub n buff.

Supplies Used:
 Coming Soon to Gina's Designs:
Steampunk doilies (will be available in white or black)
bricks
Related Posts Plugin for WordPress, Blogger...