Showing posts with label Veronica. Show all posts

Thursday, September 25, 2014

Seasonal Wall Decor by Deann and by Veronica

Hello Crafty Friends!  Yesterday was the official first day of Fall, and today we have two amazing projects to decorate your home for the season.  First up is Deann.  It's amazing the effect she got on bare chipboard with just some simple shading with distress ink.


Good morning, Deann here with a Fall project .
I made the Boo Wall Decor 
 I used Distress inks in Gathered Twig, Rusty Hinge and Scattered Straw, applying them directly to the raw chipboard.
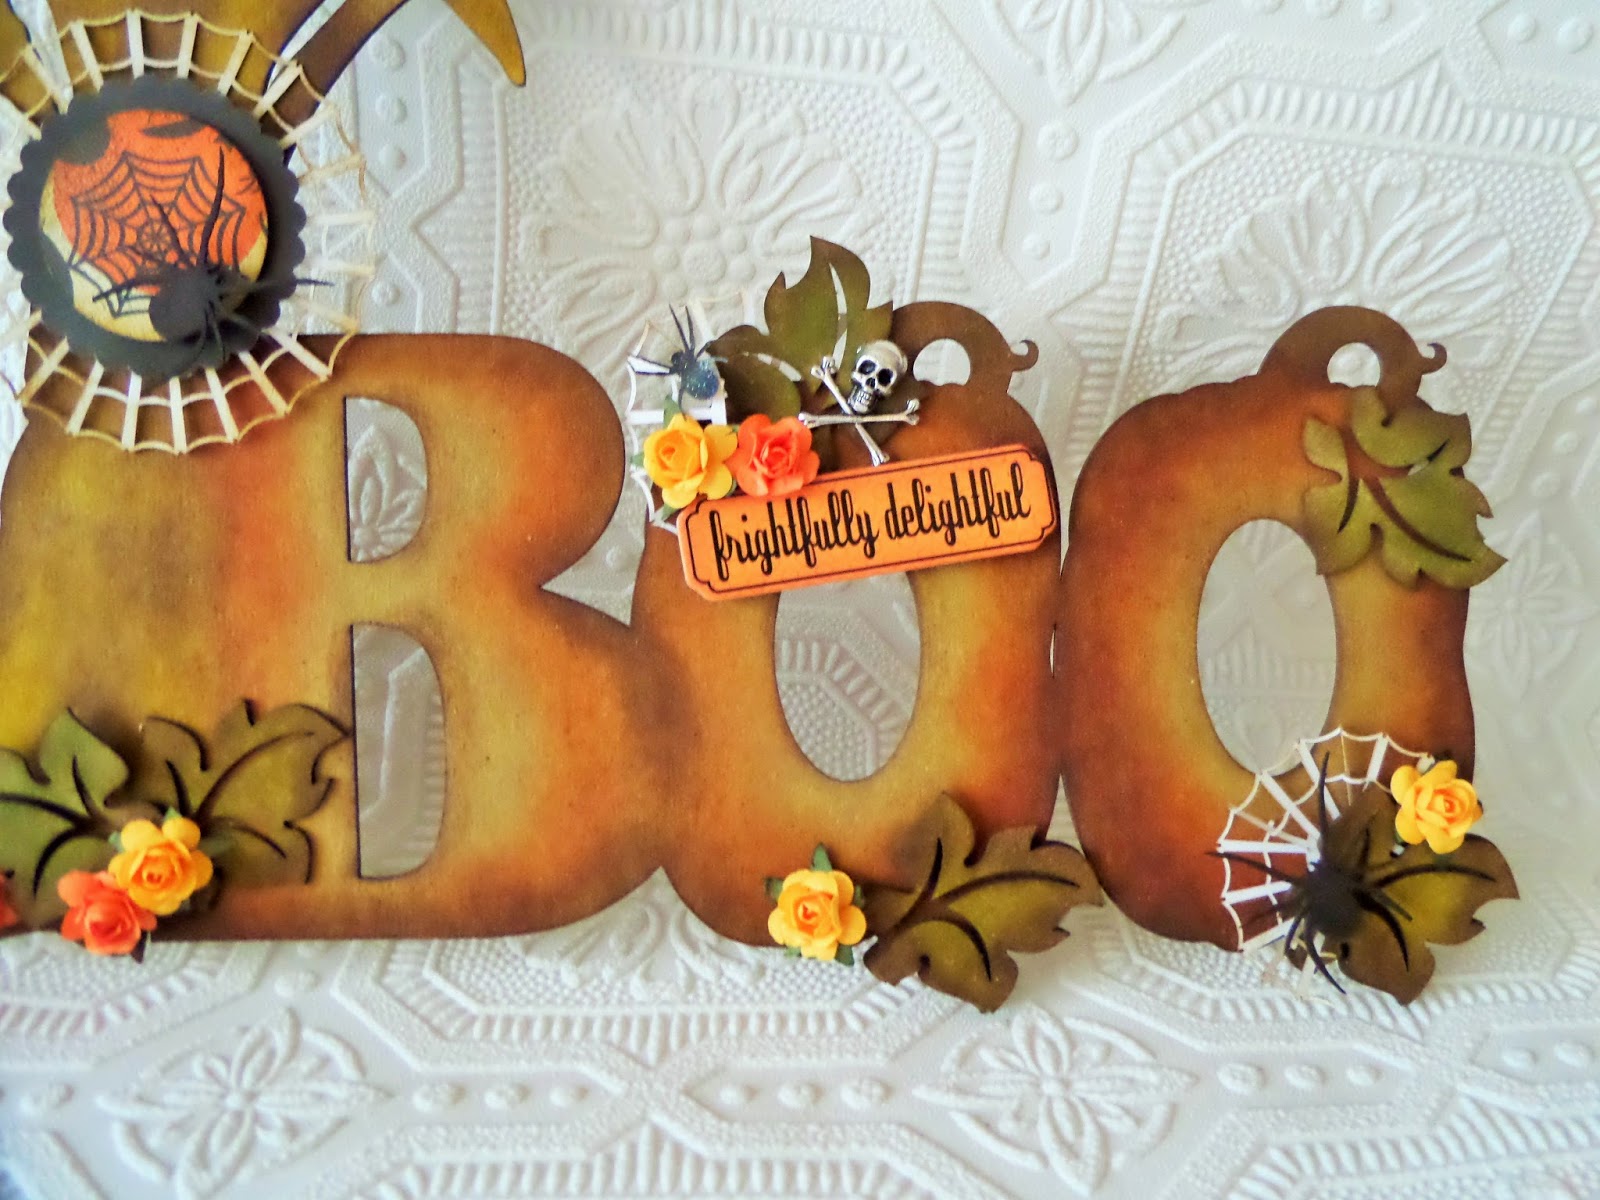
I love the shading that I got on the chip board, I added a few spiders and webs and also fall colored flowers. A Halloween sentiment to finish it off.
(((HUGS)))
Deann
Gina's Designs Products used:
Other Products from Craftsupplies1


Next up today is Veronica, and she is combining our Fall Shape Set with items from the floral department of your local craft store to create this amazing piece.


Hello Everyone! Veronica here once again to share my fall project for Gina's Designs.
My most favorite time of the year! I am so excited to see the colors of Autumn come in to play!
Gina's Fall Shape Set is packed with lots of chipboard shapes that are perfect for any Fall themed project!

Here I made a Fall Harvest Wreath.
Gina's Designs  had just what I needed to set the Fall Theme!
The Scarecrow, corn stalks and pumpkins all dressed up my wagon wheel so well!
 I am ready to go on a hay ride through a pumpkin patch!

Thank you again for stopping by.
Happy Harvest to All!


Other Items used in Project:
Copic Markers
Ranger Distressed Inks


Thursday, September 11, 2014

Fall House Shrine Box by Deann and a Layout by Veronica

Hello Friends!  Today we have two amazing projects to share.  First up is Deann with a project celebrating the beginning of the Autumn season.

Its Fall ya-all!!!
I used the House Shrine Box for this project and the awesome Fall Shape Set.
I did lots of layers on this project with the chip board and the Distress ink.

 The Scarecrow is the piece that started this project, I knew that I wanted to make it stand out. I went directly onto the raw chip board with the Distress Ink, Scattered Straw then Rusty Hinge and finished off with Gathered Twig. I used the same colors on the pumpkins with the addition of Forest Moss.   

(((HUGS)))
Deann
Gina's Designs products used:
other products used-
Flowers from craftsupplies1

Next up is Veronica with a gorgeous layout to share.

Hello Everyone! Veronica here once again to share one of my projects using wonderful Lazer cut chipboard pieces from Gina's Designs!
Today I created a lovely Scrapbook page.
I love to layer, and Gina's Designs  gives you so many shapes to choose from!
Here I used a variety of pieces. 
              I love how adding a simple Doily adds a touch of femininity to a layout.


The Skeleton Clock also adds a touch of Nostalgia.


Thank you so much for taking a look. I hope you enjoyed this Layout as much as I enjoyed putting it all together.


Tuesday, August 19, 2014

Composition Boxes by Nancy and by Veronica

Hello Everyone!  Today we have two designers on the blog, both creating their versions of our Composition Box.  You've been seeing versions of this box all month, and as always, it's so amazing to see each designers version.  This heavy chipboard kit comes with 3 smaller boxes to assemble and place within (or on top of) the large box, a wooden key, and a number of your choice.  Create your own project in any theme you'd like, or choose a number to correlate with a special year or a special day.  Anything goes!


Hello Crafty Friends!  Nancy here to share my version of our composition box.  Halloween is my favorite time of the year to scrap.  There are so many fun Halloween themes, and it's so hard to chose between witches, vamps, zombies, and other ghoulish themes,  that I usually end up making many projects during the Autumn months.  I knew as soon as Gina designed this awesome piece, exactly which numbers I'd choose.


Gina's Designs Products used:

Other:
Tim Holtz Halloween-themed stamps, rub-ons, and die
Collage sheets from Alpha Stamps
Collage sheet from Raiders of the Lost Art


Next up is Veronica with her version of our Composition Box featuring the number "13".


Hello again! Veronica here, and today I wanted to share a Composition Box that I Altered from 
Gina's Designs for this month's Team Challenge!
We each were to select a number, and I choose the number 13.
I love cats, and I have always had a heart for Black Cats. 
The number 13 just seemed fitting for me.
 One may be superstitious in thinking that the number 13, and Black Cats are anything but Lucky....
I truly dare to differ!
This is my first Composition Box that I have ever worked on.
I love going through the Gina's Designs store, and finding just what I need to complete a project.
Like the Stackable Labels Shape Set. It gave me the effect I wanted to tell my story....
that Black Cats, and the number 13 is Lucky!
 Black Jack was the name of my cat as a teenager. He was the Best!
I love that the Composition Box comes with 3 smaller boxes to place all your memorabilia. 
I just simply painted the entire box black, then added Viva Crackle Paint to give it a bit of an weathered and worn look. Then I decorated to my heart's content using paper from Carta Bella and embellishments from my ever growing stash of craft supplies.
It also includes a key and of course the number of your choice!

Thank you so much for stopping by!
Have a Blessed Day!
Other items used:
Black Spray Paint
Viva Crackle Paint
Memento Tuxedo Black Ink
Carta Bella Moments & Memories


Monday, July 14, 2014

Altered Canvas by Veronica and Trinket Box by Donna

We have two designers on the blog today with some truly inspiring projects to share.  First up is Veronica.


Hi Everyone! Veronica here to share an Altered Canvas that I made for a friend of mine. I'm calling it "She Stood in the Storm", as she just recently beat breast cancer.  I wanted to show her my support through a mixed media canvas.
Gina's Designs  has so many wonderful choices in laser cuts, that I was easily inspired!
I love having all my medias at reach any time I work on a project.
  I just go at the canvas with how I'm feeling at that moment, and with so many chipboard shapes to choose from, I find myself immersed into a Mixed Media Heaven!

Thank you so much for stopping by,
and have a Blessed Day!


Products used:
Gina's Designs
Dress Forms 1 Miniature Shape Set
Doily Set Intricates
Steampunk Lady
Vintage Ladies Silhouettes Set
Art Deco Borders & Corners


Next up is Donna to share one of our trinket boxes.  These boxes are actually quite large at 7x7x3.

Hi scrappy friends, it's Donna again with a trinket box from Gina's Designs. This is a great item to make as a gift or just to keep all your special trinkets and scrapbook goodies in. It is a great size, sturdy and very easy to assemble. The dark color hardwood is a beautiful, smooth, semi gloss brown color. I almost hated to cover it up with paper!


The first thing I did, before I assembled the trinket box, was to take each piece and trace an outline on the paper I chose to cover the box. You have control of which parts of the paper you will use for each section.  It was very easy to cut out the shapes and glue them to the hardwood pieces. I did not paint the sections of the box that would not be covered with paper. As I previously mentioned, the hardwood is a very beautiful color. Then being very careful to attach the paper to the correct side of the hardwood sections, I glued the paper in place.  If needed, take a small file of some type and gently sand/file down the areas your paper may not fit exactly over the shape of the base and lid of the box. I had a lucky day, mine fit perfectly!

And then the real fun begins when it's time to add the embellishments: a few fussy cut flowers, paper flowers, gold lace, cameos, pearl sprays, pearls, crystals, and I added a couple of birds on branches from Gina's Birdwatching Shape Set.  I covered the chipboard shapes, with gesso, let them dry, and then painted the two birds with antiqued bronze crackle paint. The branches were painted with artichoke shimmer texture paint. I wanted to keep the chipboard simple because there are a lot of embellishments on the box. And I added a brass handle to the lid. There is a pre-drilled hole in the lid if you need it. There are so many beautiful knobs and handles out there to choose from for this fabulous box!


It was very hard to capture, in photos, how beautiful the muted colors of the paper and flowers work together, and how pretty the brass stamped cameos and handle are. The flowers and tips of some of the leaves are misted with gold shimmer mist. They really have a beautiful sheen in person. I also added paper to the inside of the box. 


Gina's Designs products


Other products

Fabscraps Heritage paper
Gold sparkle lace from Tresors de Luxe
Brass stamped cameos and frame from Etsy
Gold pearl sprays
Gold shimmer mist
Misc jewelry pearls and crystals
Flowers and leaves from Prima
Misc flowers from stash
Antiqued bronze crackle paint
Shimmer texture paint-artichoke
Crafters Pick - glue

Thank you for stopping by Gina's today! I hope I have inspired you to make something beautiful!


Tuesday, July 1, 2014

Three Cheers For The Red, White and Blue! Artist Trading Blocks

Six times more fun than an Artist Trading Card! Able to stack up, hold gifts or become dimensional sculptures! It's a bird... it's a plane... it's an Artist Trading Block! This fun new art form has grown in popularity since it first appeared on the crafting scene a few years ago. Gina's Designs has joined the fun and you will be seeing ATB's all month from our talented designers.

Hello Again Everyone! Veronica here to Celebrate our Independence Day with Gina Designs!
Today's project is three Artist Trading Blocks stacked on top of one another to create a fun 4th of July center piece!
The 4th of July has always meant a lot to my family, because my Dad fought in the Vietnam war.
 So every year I find myself creating a fun decorative center piece for the 4th of July Barbeque.
These Artist Trading Block are perfect to make a lovely holiday display!

                                    
     Three Cheers for The RED, WHITE, AND BLUE!


Other items used:
Authentique's  "Pride"  Collection


Sunday, June 1, 2014

Under The Sea Mermaid Block by Veronica

Hello Everyone! Veronica here to share a project using a Mermaid from Gina's Designs Mermaids Shape Set!
I am just in a sea faring mood with all my projects lately, and Gina's Mermaid Shape Set  is just adorable! I love how this particular Mermaid's hair flows in the water!
I painted a wooden block to look like water, and then added some of Gina's Flourishes, a Starfish and Sea Shell from the
In the Mermaid Shape Set you will find 12 Mermaids ranging in different styles and sizes. Just perfect for your Ocean themed project!


Monday, May 19, 2014

Desk Organizer by Veronica

Hello Again! Veronica here today to show off Gina's Desk Organizer.
This piece can be decorated many different ways to personalize your needs and to match your decor.  I chose to only decorate the outside of the organizer, using one of my favorite paper collections, the Kaisercraft 75 cent collection.  I  kept the inside the beautiful dark wood color.
I am using my organizer to store some of my paint brushes instead of just pens or things needed at a desk.

Here you can see some of our Doily Intricates. I just love them!

Thank you all for stopping by, and have a Blessed Day!


Monday, May 12, 2014

"Happiness" An Altered Canvas by Veronica


Hello Again! Veronica here sharing an Altered Canvas. I created this for my Mother who is really hard to please.   She really loved it, making it all worthwhile!
I actually started this one last September, but wasn't sure where to go with it. So I stepped away.....for 8 months!
Gina's Designs and Laser Cuts are truly an inspiration for me to complete a project!

 Here you see her Laser Cut chipboard comes in so many shapes and I just love anything with a Paris theme.
Her Parisian Shape Set  is ideal, and I special ordered the Eiffel Tower from Gina in a larger size to fit my canvas.
 
Love the added touch of the  Hot Air Balloon   
This particular one is the Net Style.


And one can never have too many of Gina's intricate Doilies on hand!

Hope you enjoyed today's project! Thanks for stopping by.

( Special Order on Eiffel Tower Size)

Monday, May 5, 2014

May Sketch Challenge with Sample Layout by Nancy and an altered frame by Veronica


Welcome to the May Sketch Challenge!

Each month, on the first Monday, a new sketch will be provided.  Use the sketch to create a layout, card or other craft project.  Winner will be drawn from all eligible entries and will receive a $10 gift certificate to Gina's Designs online store.  We encourage you to use Gina's Designs products in your project but it is not required to be eligible to win.  You have until the first Monday of the Following month to enter and the winner will be announced on the blog on the second Monday of the following month.  Use the Link Up tool below to enter.
Here is the sketch for May

Here is my take on the sketch.  Once again I have featured my cat Willie.  I'm currently creating a whole memorial wall for him with all the layouts in shadowbox frames.  I love looking at it, it makes me smile.  I began this layout with some background stamping, and I also used our Steampunk Doily as a stencil, then turned it to the other side and layered the actual doily behind the photos.  

Gina's Designs Products Used:

Cardstock Doily Set Steampunk (I had these cut in 8 inch)

Next up is Veronica with an amazing altered frame filled with vintage goodness!


Hello Everyone, Veronica here to share an altered frame project using several pieces from Gina's Designs.


I had this frame all covered in Gesso and ready for something over a year ago, but didn't have a clue where to go after that!  Finally, after looking through my chipboard shapes, I got inspired to bring it back out and do something with my Grandma's in mind.
Gina's Doodled Cages is a perfect addition, my Grandma loved birds.
 One can never have too many of her Wooden Decorative Keys!

                       
I adore Gina's Dress Forms!


Thanks again for stopping by! Have a Blessed Day!


Monday, April 28, 2014

Celestial Stage by Nancy and Banner by Veronica


Today we have two projects to share.  First up is Nancy with one of our fun altered art pieces.  This piece can be decorated to suit any number of themes.

Hi everyone, Nancy here!  I had so much fun decorating this Stage.  I love anything to do with the sky, stars, moon and all things celestial, so I thought I'd call my creation "Reach For The Stars".  I added lots of textures to this piece with chunky glitter, glass beads, bead gel, shabby embossing powders, mica, gilder's paste, etc.


Gina's Designs Products Used:

Queen Anne's Lace


Next up is Veronica with a gorgeous vintage styled banner incorporating lots of fun chipboard shapes!

Hello Everyone! Veronica here, to share with you Gina's lovely C-R-E-A-T-E Dovetail Banner.
I added Gina's Doily Intricates to give the letters some pop.
Here is a her Butterfly Of Gears. Just adds a creative feel to the banner's theme.
Here I added one of Gina's String Alongs this one is" Sewing", and of course I couldn't finish without one of Gina's wonderful Flourishes Miniatures!

Thank you again for stopping by!


Monday, March 24, 2014

Spring Fairies Bird House by Veronica and an ATC tray by Deann

First up today is Veronica with a sparkly and glittered altered birdhouse.

Hello again, Veronica here! Today I am sharing an altered birdhouse featuring fairies from Gina's Designs, butterflies from CraftSupplies1, and a new product called Vintage Sparkle Glitter from the scrapbooking store where I work.  I created it as a sample for the store to show the glitter, and first thing that came to my mind was the Garden Fairies from Gina's Designs
I mean what a better combination? Fairies and Glitter!
I was also able to easily use these beautiful butterflies from Craftsupplies1
Gina's Designs really made the project! Her Garden Fairies are a must to have for any garden mystical project.
A beautiful butterfly  from Craftsupplies1 
On top of my magical fairy bird house, I added Dragon Flies  from Gina's Designs, and I love the Vintage Sparkle all over the Dragon Fly.
Here's the back of the Fairy Bird House. I just love how the Garden Fairies Wings from Gina's Designs, just sparkle with glitter! You can also see the Flourish used to decorate the back of the house.
Thank you for stopping by. I loved working on this project, because it made me ready to go out and tackle my own garden for spring planting!


Other Products Used:

Vintage Sparkle Glitter
Ferro Special Effect Paste
Copic Markers
Gesso

Next up is Deann with "Time For Tea", an amazing shabby vintage  ATC display tray

Good morning , I wanted to share a project with you all . I made a Tea themed wall hanging using the 

                                                            Roses in the sugar bowl


 A Tea pot full of roses !

Cottage window with a flower box

Thanks for stopping by! 
(((HUGS)))
Deann

Products used from Gina's Designs-


Related Posts Plugin for WordPress, Blogger...