Showing posts with label Dressforms 1 Miniature Shape Set. Show all posts

Friday, September 4, 2015

Vintage Dressform Note Cards by Kim C.

Do you ever just need a simple but lovely note card to send with a gift?  I know I do from time to time, so I decided to make some vintage note cards.  These are simple, but very easy to make 3 x 3 note cards.

I started with some kraft colored cardstock and added some vintage looking pattern paper.  Vintage lace was added to the edge of each card.  The dressforms have some gesso applied to them to enhance the look of the forms.  I then made a punched flower with a flat back pearl to the center of each one.  I didn't add any sentiment to the cards, I can do that when I send each one of them out.
Thanks for stopping by!

Gina's Designs Used:

Other items used:
Kraft Cardstock
Vintage Lace
Gesso
Pattern Paper: Paper Studio Mirabelle Collection
Flat Back Pearls
Punches

Monday, April 13, 2015

Steampunk Altered Tea Box

I've had these awesome papers for ages and until I started browsing through the my great collection of Gina's chipboard, I really had no idea how I wanted to use it. The papers and chipboard pieces ended up being a match made in heaven (or in my scraproom!) for this tea box I had saved.
I used Dusty Attic Rusting Powder on the barbed wire frame, then rubbed it with Smooch ink for a worn, vintage look.

 The gears were finished the same way as the frame. The dress form was painted, then stamped with Versamark and heat-embossed, and the bee was covered with black flocking. I had a blast picking out pieces that worked with the papers and giving them different looks and textures!
Here's my bow/topper; just paper strips and black tulle, with a couple butterflies added here and there. Thanks heaps for checking out my project, and remember to hang on to interesting boxes and other containers; you never know when you'll be inspired to create something interesting with them :)

Gina's Items Used

Saturday, January 3, 2015

Window Tag by Deann

Good morning, Deann here to share my window tag.
The tag is also for the January Color Challenge at Gina's Designs Craft Group on Facebook.
On the tag I used a window from the Arched Windows Set as the theme. Behind the window I added a clock face, from the Steampunk Shape Set, and a dress form from Dressforms 1 Miniature Shape Set. On top of the window, I added the word fantastic from Word Ribbons 4.
Thanks for looking :)

Gina's Designs Products Used:

Tuesday, November 11, 2014

Altered Mason Jars

Hello, fellow crafters, today I am here to share with you two of the altered Mason Jars I have created for a fall bazaar.

 
These are two of the Mason Jars. I first placed the candle stick on the base of the mason jar, then colored the jars a light yellow, using food coloring & mod podge. After I let them dry, I cut some images from graphic 45 paper 3 1/2" X 12" paper. One jar I used Old Curiosity Shop & the other one I used the French Country line. 


I added a hand crafted flower to the center front of the jar, adding embellishments to the front of the flower as well as tucked in behind the flower. This jar I placed a key & lock from Gina's, then stuffing behind the flower, a dress form, an antique chair,  derby hat, a top hat & flourishes. I then added tags from the paper line,  and finished the jar with a black ribbon tied into a bow on the rim of the lid.


Close up of the embellishments.


Jar #2
I added a hand crafted flower to the center front of the jar, adding embellishments to the front of the flower as well as tucked in behind the flower. Then, behind the flower, I placed a dress form,  derby hat, top hat & wings, along with tags from the paper line. I finished the jar with a black ribbon tied into a bow on the rim of the lid, and placed trim on the top & bottom of the paper. The bottom trim is from Craftsupplies1.
 

Close up of the front of jar #2.

Supplies Used:
Gina's Designs:

Dressforms 1 Miniature Shape Set

Steampunk Shape Set

Miniatures Shape Set - Guy Thing

Other Items Used

Craftsupplies1 Trims 

Graphic 45 Paper

Hand Crafted Flowers Made by Myself, Kathi


Monday, July 14, 2014

Altered Canvas by Veronica and Trinket Box by Donna

We have two designers on the blog today with some truly inspiring projects to share.  First up is Veronica.


Hi Everyone! Veronica here to share an Altered Canvas that I made for a friend of mine. I'm calling it "She Stood in the Storm", as she just recently beat breast cancer.  I wanted to show her my support through a mixed media canvas.
Gina's Designs  has so many wonderful choices in laser cuts, that I was easily inspired!
I love having all my medias at reach any time I work on a project.
  I just go at the canvas with how I'm feeling at that moment, and with so many chipboard shapes to choose from, I find myself immersed into a Mixed Media Heaven!

Thank you so much for stopping by,
and have a Blessed Day!


Products used:
Gina's Designs
Dress Forms 1 Miniature Shape Set
Doily Set Intricates
Steampunk Lady
Vintage Ladies Silhouettes Set
Art Deco Borders & Corners


Next up is Donna to share one of our trinket boxes.  These boxes are actually quite large at 7x7x3.

Hi scrappy friends, it's Donna again with a trinket box from Gina's Designs. This is a great item to make as a gift or just to keep all your special trinkets and scrapbook goodies in. It is a great size, sturdy and very easy to assemble. The dark color hardwood is a beautiful, smooth, semi gloss brown color. I almost hated to cover it up with paper!


The first thing I did, before I assembled the trinket box, was to take each piece and trace an outline on the paper I chose to cover the box. You have control of which parts of the paper you will use for each section.  It was very easy to cut out the shapes and glue them to the hardwood pieces. I did not paint the sections of the box that would not be covered with paper. As I previously mentioned, the hardwood is a very beautiful color. Then being very careful to attach the paper to the correct side of the hardwood sections, I glued the paper in place.  If needed, take a small file of some type and gently sand/file down the areas your paper may not fit exactly over the shape of the base and lid of the box. I had a lucky day, mine fit perfectly!

And then the real fun begins when it's time to add the embellishments: a few fussy cut flowers, paper flowers, gold lace, cameos, pearl sprays, pearls, crystals, and I added a couple of birds on branches from Gina's Birdwatching Shape Set.  I covered the chipboard shapes, with gesso, let them dry, and then painted the two birds with antiqued bronze crackle paint. The branches were painted with artichoke shimmer texture paint. I wanted to keep the chipboard simple because there are a lot of embellishments on the box. And I added a brass handle to the lid. There is a pre-drilled hole in the lid if you need it. There are so many beautiful knobs and handles out there to choose from for this fabulous box!


It was very hard to capture, in photos, how beautiful the muted colors of the paper and flowers work together, and how pretty the brass stamped cameos and handle are. The flowers and tips of some of the leaves are misted with gold shimmer mist. They really have a beautiful sheen in person. I also added paper to the inside of the box. 


Gina's Designs products


Other products

Fabscraps Heritage paper
Gold sparkle lace from Tresors de Luxe
Brass stamped cameos and frame from Etsy
Gold pearl sprays
Gold shimmer mist
Misc jewelry pearls and crystals
Flowers and leaves from Prima
Misc flowers from stash
Antiqued bronze crackle paint
Shimmer texture paint-artichoke
Crafters Pick - glue

Thank you for stopping by Gina's today! I hope I have inspired you to make something beautiful!


Saturday, July 12, 2014

Floral Cards by Shanna and Artist Trading Blocks by Donna


Hello Everyone!  Today we have two Designers on the blog.  First up is Shanna with some gorgeous cards.

Hello and how do you do.  Shanna here with another set of fun cards to share with you today.


I loved using this paper collection with these flowers. It helped make the flowers just pop to me.

I gave my chipboard just a single coat of gesso and made them the main event of my cards.


Items Used:
Gina's Designs Lasercuts


Next up today is Donna sharing her take on the Artist Trading Blocks that each team member is creating this month.  We've seen several so far and each artist's version has been uniquely different and equally awesome!


Hi, it's Donna here today to share my Artist Trading Blocks from Gina's Designs!  I chose to decorate my blocks with a Paris theme.  Ooh La La!  They are so easy and so much fun to put together and decorate! The options are endless! I also used Gina's miniature dress forms on all four sides of the three boxes. It's really great that you can special request Gina's chipboard shapes in many different sizes! The tiny dress forms I used on the two smaller boxes are a special requested size, and are so darn cute!!!!!!!!


After I glued the boxes together, I painted the corners black with chalk ink so the color of the box would not show. I could have also used black gesso or paint.  I chose the paper I wanted to use for each box and each side, including layers, cut them, and glued them to the box. I then got out "the works" and just started having a blast! Pearls, feathers, bling, flowers, lace, glass knobs, shabby ribbon, netting, stickers, and wooden feet!


Then it was time to decorate the dress forms! I painted all the dress forms with gesso, with the exception of the black ones. I used black chalk ink directly on the chipboard and that worked fine. I would have probably used black gesso if I had it.  I find it best to cover my chipboard shapes with gesso as a protective coat before painting or embossing.  I used vintage pink chalk ink, over the gesso, on the darker pink dress forms. Two of the little white dress forms are covered with white opal liquid pearls, and the other set with white chalk ink and spun sugar distress stickles. I was having so much fun with the darling dress forms, I also made two free standing dress forms! I added a piece of cardboard to the back so they could stand up!


Thank you so very much for stopping by today! 

 Gina's Designs products


Other products 

Authentique Classique: Pretty paper and sticker sheet
Glass knobs - Hobby Lobby
Feathers
Flowers
String pears, Black and White
Wooden feet - Hobby Lobby
Lace - misc from stash
Chalk ink - Black, vintage pink, white
White opal liquid pearls
Spun sugar distressed stickles
Crafter's Pick glue


Saturday, March 15, 2014

A Mixed Media Layout by Melissa and a Wall Art Project by Marfa

Hi everyone!  Today we have two amazing and very different projects to share.  Both projects today are part of our month long cross promotional with CraftSupplies1.  The ladies on both teams have done an amazing job combining the products.  First up is Melissa with layout in soft pink vintage tones.

Hi, it's Melissa here with a layout using Gina's Designs Lasercuts, and items from Craftsupplies 1


In this project I wanted my layout to reflect the detail of the photo. I began by painting watercolor paper with watercolors to get a soft and delicate look.  I added texture paste, and used the same paint.  I also  applied Twinkling H20s , and art deco pen ink. 

I like how well the chipboard complements the era.   I especially like the fan, and how it gives a very feminine touch to the page.

Chipboard used:

Flower Filigrees
Silver Fairy Sprites
White Flowers
White Roses

Other products used:
Vintaj Patina Paint
Winton and Lewis Watercolors
The Crafters Workshop stencil
Stickles
Tim Holtz rub ons


Lumiere Paint

Next up is Marfa with a project she is calling "Spring Sweet Spring".  I love the colors she used and the techniques for coloring the chipboard. 


Good morning chickadees!  This is Crafting Marfa with you today.  This month Gina's Designs and Craftsupplies1 are having a cross-promotion.  Both teams have received products from each store.  Today I'm sharing my Spring Sweet Spring canvas.  Its not really a "canvas" because I used a 12 x 12 slab of wood.  I've been in the mood to do something related to Spring because it is cheerful and I love cheerful things.  I created the background by first covering the wood with white gesso.  Then I sprayed ink and rubbed it around with a piece of paper towel.  I used lots of chippies from Gina's Designs.  I also used lots of roses and butterflies from Craftsupplies1.  I coated the chipboard shapes with white gesso and then I colored them with Copic markers.  If I didn't use gesso first the chipboard would not have shown the ink from the Copic markers.  I hot glued everything down (burned my fingers a couple of times too...lol), then  I finished the canvas with a little doodling and a little lettering.  I had already attached a sawtooth hanger and now my art piece is hanging on a wall in my dining room.  Scroll past the photo for a list of supplies :-)


Supplies from Gina's Designs


Other Supplies

Hot Glue
Copic Markers
Sharpie Marker
Gesso
Delysions Ink Sprays
Wood Slab


Tuesday, February 18, 2014

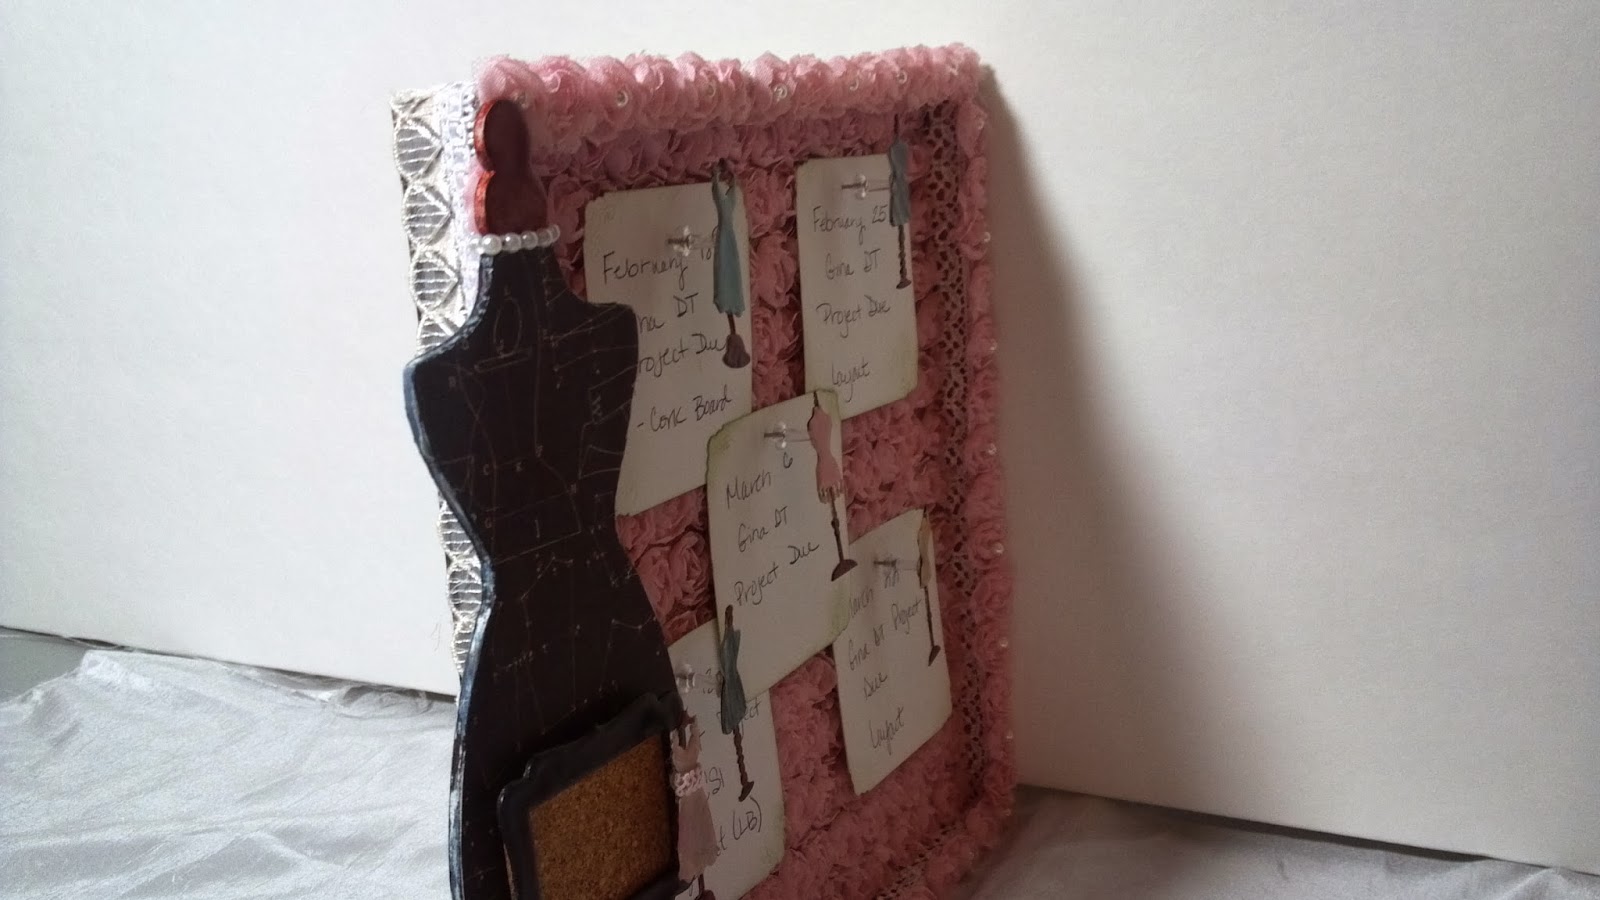
Dressform Cork Board by Mary


 Happy Tuesday! Mary here with my latest DT project for Gina's Designs. I have made a cork board  to keep track of my DT project due dates. I used the box portion of the Doily Box SEW since I used a lot of the elements that came with it on my Couture Shop project. After a good coat of gesso, I actually papered the inside and outside sides with Couture Shop by Graphic 45. 
 And then I changed directions! I covered the sides with lace and trim from my stash. On the inside, I covered it with a piece of cork board and then some rosette lace I got on Zibbet.

I used gesso on all the dressform pieces and colored them with marker before applying clear embossing powder to the miniature ones. I attached five of the mini dressforms to thumb tacks I had.
 The larger dressform (which is designed to be free standing) is covered with a piece of paper from the Couture Shop. On the larger dressform I attached a mini cork board that I made from one of the frames that was in a "thank you for order" from Gina. I attached one of the miniature dressforms to it.

For more information and pictures, please visit my blog HERE.

Thank you for stopping by the blog today!


Gina's Designs
Frame - thank you gift for past order

Other Supplies
Lace: CraftSupplies1, Suhafuha, My Stash
Flowers: Lavish Laces, CraftSuplies1
Markers
Clear Embossing Powder
Cork Board
Loose Pearls
Pearl Trims: CraftSupplies1
Paper: Couture Shop by Graphic 45


Related Posts Plugin for WordPress, Blogger...