Thursday, July 31, 2014

Let it Snow Artist Trading Blocks by Mary

Hello fellow crafters. My project today is featuring Gina's new artist trading blocks! There are actually three different sizes that come in the set, I am using the 3 and 2.5 inch size blocks.
I removed one of the sides on the bottom box and used the inside to hang snowflakes. All the paper was distressed with Black Soot. To get a true color of any of the techniques I used, I applied gesso to all of the chipboard pieces in this project.  The snowflakes are all glittered.

Here is one of the sides. The arms of the chipboard snowman are taken from the tree in the Winter Shape Set. Her chipboard hat and scarf are painted and I used flower fresh for the pom-pom on the top of the hat.

This chipboard snowman has a painted chipboard top hat. The nose is actually one of the icicles that is in the Winter Shape Set. The nose and chipboard mittens were colored with markers.

Thanks for stopping buy Gina's Designs' blog today. 


Gina's Designs Products Used

Other Products Used
Paper: K&Company - Let it Snow
Snowflake Stickers: Jolee's boutique - Snowflake Repeats
Tim Holtz Distressed Ink - Black Soot
Snowman Stamp: Hampton Art Stamps - Relaxed Snowman
Glitter
Markers
Flower Fresh
Flocking Powder
Silver Thread
Paint


Wednesday, July 30, 2014

Mixed Media Art Journal by Kim


Hi Crafty Friends! Today I would like to share with you one of the new items coming very soon to Gina's Store. This is the new Art Journal, and I just love it!  I have always wanted to start an art journal and this was my excuse to give it a try.

 The Art Journal comes with 4 dividers, and some chipboard pages for you to get started. I have covered the divider pages with some random papers from my stash, which will each get some work done on them over time. I plan on using this book quite a lot! 
I really wanted it to represent me and my style, so I chose to do a lot of texture on the front and back covers and used tons of Gina's items on it.
First I layered on various chipboard pieces then I painted them over with gesso. Then used Shimmerz Sprays, Texturez and Paints on them to give them sparkle and nice color tones.


 Back of the Art Journal
 Inside of Art Journal


 Top View


 I got out some of my air dry clay and rolled out a rectangle and then used my stamp that says "create art", and made an impression in the clay for a focal point in the center of the journal. I used some black stayzon ink to make it pop out in the middle while just keeping to softer tones around the outside of it.
Below here you can see a close up of the texture, I have used some crushed up seashells I got in the nail art section on Ebay to add further texture. I just added them with a bit of glossy accents and they stuck down great.


I hope this will inspire you to keep an art journal of your own!
Thanks for stopping by today.

Gina's Designs Items Used
 Art Journal (Coming SOON!)

Other Items Used
Wild Orchid Crafts
Creative Air Dry Clay
Dark Room Door "Create Art" Stamp
Crushed Sea Shell Nail Art Decorations
Gesso
Various Papers from my Stash
White Seam Binding
Stazon Ink Black


Tuesday, July 29, 2014

Home Decor - Key and Crest by Nancy

Hi Everyone, Nancy here!  Today I am sharing a vintage heritage project.  I thought these photos of my Dad and my Granddad, would be perfect to display on our new Key and Crest Wall hanging.  This is a good sized piece to work with, about 12 inches across.  I am really happy with how it turned out, and it's a keepsake since my Dad and Granddad are no longer with us.


 I used several products to get the look I wanted for the key and crest, meaning the scrolled areas and the key.   The center area was papered with the DCWV Timeless Type Stack.    I began by using a fan shaped brush to achieve a light dry coat of gesso (at that point some raw chipboard still shows through).  Next I covered the whole piece with a bright turquoise luminescent type paint.  Following that I dry brushed a bit of bright orange here and there.   Next I embossed over everything with Tim Holtz vintage photo distress embossing powder.  Following that step I stamped over the whole piece with a burlap textured stamp,  and embossed those areas with copper colored embossing powder.  I then rubbed Gold colored Gilder's Paste all along the edges.  Thanks for looking!


Gina's Designs Products Used:


Monday, July 28, 2014

Artist Trading Blocks by Dianna and a Layout by Donna

Hello Crafters!  Today we have two projects to share, first up are more of our Artist Trading Blocks.  We hope you've been enjoying all the different ways these blocks can be decorated.

 Hi all, it's Dianna here, and these are Gina's Designs Artist Trading Blocks. I went for a Steampunk Style. The bottom block is distressed corrugated paper torn to expose Gina's Designs gears painted in gold and bronze then inked with Tim Holtz's distress inks.


I fell in love with The Butterfly of Gears and had to use it on the front.  The second block is distressed paper with gears that turn on brads.


The top block is a permanent clock but the other sides are held with magnets so that the top block can change with the seasons, literally.


I used Gina's Designs Spooky Shape Set and Spiderweb Shape Set.


Items Used
Gina's Designs

Butterfly of Gears
Cardstock Doily Set Steampunk
Clock Hands Shape Set
Steampunk 2 Shape Set
Steampunk Shape Set
 Sketelon Clocks
Spooky Shape Set
Spiderweb Shape Set


Tim Holtz
Distress Ink
Stormy Sky
Black Soot
Vintage Photo
Tea Dye


Next up is Donna with a 12 x 12 Layout called "Believe".


Hello friends! Today I am sharing a layout created for Gina's Designs, which is very close to my heart.

I used two of the stackable labels to make a cross, using gold tinsel embossing powder. I added one of the white cardstock doilies, under the round sentiment, and placed it on top of the cross with a few pop dots.  I then placed a crocheted doily underneath the cross. 


I have been saving the gorgeous chipboard wings for something special! I embossed the wings with a pearl like embossing power called Angels Dust Ruby. I tried to capture some of the beautiful colors and shimmer from the embossing powder in this photo.


I used dry fine star dust glitter for the word Believe.

Gina's Designs Products


Other Products

Kaisercraft BeaYOUtiful cardstock collection
Prima resin angels
Prima photo frames
Prima Valentine red vine
Angel Wings Ruby embossing powder
Gold Tinsel embossing powder
Stardust dry fine glitter
White chalk ink
Pearls
White doily from Etsy

Thank you so much for stopping by Gina's today. Don't forget to make time to create something beautiful!


Sunday, July 27, 2014

C is for.......Letter Your Life by Deann

Good morning, Deann here with a new project using Gina's new Letter Your Life.  It can be any word you want up to ten letters.  I did the letter "C" for Craft Dee 1, my blogger name, and this project will hang in my craft room.
As you can see, I split my 10 letters to spell two words. The first letter of the first word is my capital letter.
The capital letter is 10.75 inches tall, a great size for a wall hanging


Thanks for taking a look :) 
(((HUGS)))
Deann
Gina's Designs products used: Letter Your Life

Other products used:
Burlap ,flowers and lace from Craftsupplies1


Saturday, July 26, 2014

Artist Trading Blocks by Shanna and Brigitte

Hi Everyone!  Today we have two artists on the blog with very different takes on our feature this month, Artist Trading Blocks.  First up we have Shanna

Shanna here today to share my newest creation. I got the idea from using Tim Holtz's monthly tag he creates! I used lots of paints and inks and crackle paint. It was so fun to create. I have a quick tutorial on  my blog on how I altered my chipboard so stop by here to check it out and more up close photos on my  project.


Items used:
Gina's Designs Lasercuts

Next up we have Brigitte.


Hello crafty friends, Brigitte here!  I am excited to share my Artist Trading Blocks (ATB's) with you today from Gina's Designs, featuring the French Seamstress digital papers from the wonderful Luisa at Kitty's Scrap Post.

Please take a look at the photos as I have tried to show as much detail as I could......being the amateur photographer I am LOL!


Thank you and have a wonderful, crafty weekend!  xo, Brigitte

Gina's Designs Products used:


Friday, July 25, 2014

Ladies Diary Birthday Cards by Kathi and An Altered Letter by Mary

We have our two designers up today,  Kathi and Mary to share with you their creations. First up is Kathi!
Hi everyone, Kathi here, thanks for joining me!  I have two cards to share today, in a design that's elegant yet easy to create.

Card 1


 Card 2


Video of Cards

Supplies used:
Gina's Designs Lasercuts

Graphic 45 - Ladies Diary
Paper Doily
Corrugated circle
WOC flowers
Lace & Trim from Stash
Lindy Stamp Gang Sprays
Distress paint
Rock Candy Glitter
Handmade lace flowers

Thanks again for stopping by, and have a great day!

Now over to Mary who has something fun to share!

You know what today is? Today marks five months til Christmas Eve! Just a friendly reminder to start on all the gifts you were going to make last year but ran out of time!
Today I have another new item in Gina's store, the new "letter your life". With these you get to custom make your word! That's right, crafters. The large letter will be the first letter in the word you ask for. Just think of all of the possibilities!
I guess I had laundry on my mind when I was asked to pick a word since that is what came out of my mouth.
I wanted this to be fun yet simple since it will be hanging on the wall in the basement. 
I covered the "L" with paper and embossed the word laundry.
 It will be mounted on the wall but I still need to paint it (my mom and I have only gotten the walls primed).
I also used the new punchelements 1". These are stackable element sets that you are able to use your 1" punch with! 

Thanks for stopping by the blog today! Have a great one.
 
Gina's Designs Products

Other Products Used
Please visit my blog HERE

Thursday, July 24, 2014

ATC Shrine by Debbie & Decorative Screen by GDT Rashida

Hello everyone today we have some dual projects up by one of our newest DT Debbie, and a gorgeous decorative screen from our Guest Designer Rashida.  First up is Debbie!

  Hello Everyone! Today I would like to share my version of Gina’s Designs Artist Trading Card Shrines.  I LOVE these!!!   These are such a great idea and take Trading Cards to the next level.  Not only do you have a great Trading Card but have an amazing Shrine to display it in. I can see myself giving a few of these as gifts.


I kept this project pretty simple by applying Inka Gold over the shrine itself and then adhering a Gina’s Designs Chipboard Fairy to the outside front.  I added a crystal knob to the top and metal photo corners to the front, both from my personal stash.
To make the Gina’s Designs Chipboard Fairy stand out a bit I painted her and then embossed her with a glitter white embossing powder. I rubbed a little Inka Gold over her and added some crystals.
When you open the Shrine you’ll find a fun vile of Fairy Dust and another Chipboard Fairy.  I also added a small Chipboard Butterfly and some more crystals.  I used the same techniques on the fairy and butterfly as the front fairy.
I hope you enjoyed this project and will give them a try…they are so much fun and I’ll be making more of these!
Thanks for stopping by!
Supplies Used:
Gina’s Designs
Artist Trading Card Shrine-Wrought Iron


Now over to Rashida to share her project.....

Hello everyone! Today I’m going to share my next project for Gina’s Designs. This week I had fun working with Gina’s Designs Decorative Screens. I especially enjoyed this project because when I saw them I immediately though of layers, flowers, metal and paint….my favorite things to work with.


 For the background I painted the screens black and then layered them with Recollections multi- surface ink in both black and vintage gold. Next I layered on Snow Tex and let it dry overnight. Once dry I sprayed the whole thing with Tattered Angles glimmer mist in Summer Glow, Yellow Zest and Ranger butterscotch color wash spray.


 Once that was dry I began layering Gina’s Designs butterflies and dragonflies, which I glittered and stacked, wire, K & Co swirls and gems, trims and flowers. I then added a Prima accent piece to the center screen and tied each piece together to create the finished 3 panel screen.
That’s about it, super simple and loads of fun! Thanks so much for looking, be sure to stop by Gina’s shop to pick up a few to try out.
Gina’s Designs Items
Other Items Used 
Black acrylic paint
Recollections ink (black and Vintage Gold)
Snow text
Prima Flowers
Stickles
Trim and ribbons
K & Co swirls and gems
Recollections glass glitter gold and copper
Tattered Angles glimmer mist Summer Glow
Tattered Angles glimmer mist yellow zest
Ranger Adirondack color wash butterscotch
Gold leaf
Thanks everyone for stopping by today!

Wednesday, July 23, 2014

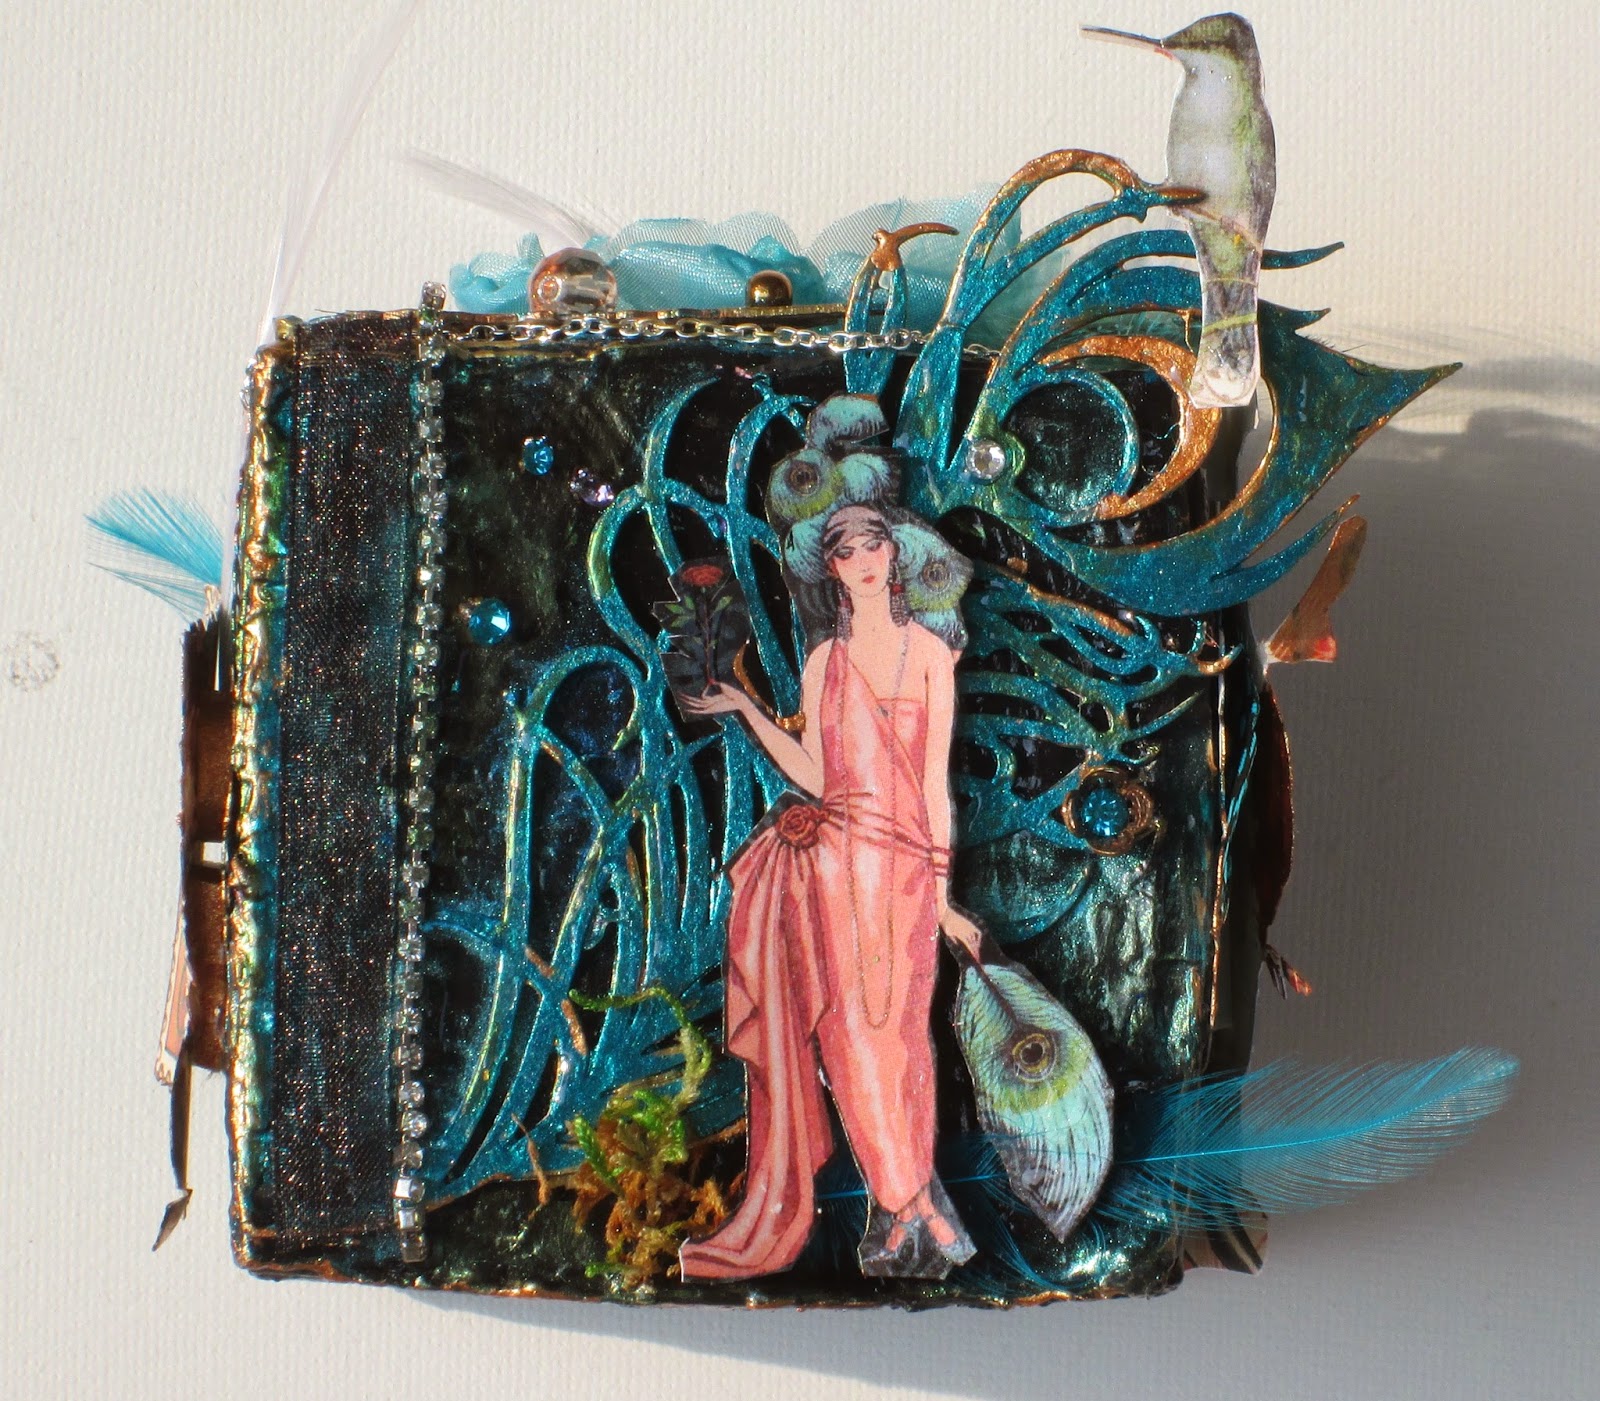
Artist Trading Block in Turquoise and Black

Hi everyone! Melissa here with my take on our artist trading block.  

I painted my block with white gesso, then black acrylic, then a coat of glossy accents.

  I felt that the chipboard and doilies I put on the block perfectly complemented the theme, and era of the images.

I painted all the chipboard with gesso, then turquoise Viva Color Precious Metal Effects. I didn't need gesso on the doilies,and I also painted them in turquoise. On some chipboard I added a little bronze paint,  stickles, green Lumieres, and/or diamond glaze coating.  I embellished my block with images, bling, metal, feathers, beads, moss, pearls, and lace.

Thanks for looking!


Chipboard used:


Other products used:
Folk Art black acrylic paint
Viva Color Precious Metal Effect Paint in turquoise, and bronze
Jaquard Lumieres in green
black ink
Graphic 45 papers: Couture Collection and Botanical Tea Collection
Tim Holtz metal
Judy Kins Diamond Glaze
Glossy Accents
Jolee's Bling
Ranger Liquid Pearls
Jaquard Mica powder
Feathers, seed beads, bling , flower, and chain from my stash


Related Posts Plugin for WordPress, Blogger...