Friday, February 28, 2014

Window Shadow Box by Kim and an Altered Canvas by Heidi

We have two amazing projects to share today.  First up is Kim, with an amazing home decor project!


Hi Everyone!  It's Kim here to share my newest creation, a Window Shadow Box done in a vintage shabby style.  It was tons of fun to create, and I love how it turned out.

I covered the inside of the box with a gorgeous black and white photo frame paper from Teresa Collins, and used aqua and turquoise as my accent colors. I painted the frame of the window with some distress paint in white, then sanded it back to the raw wood of the box to really make it look aged and distressed.


Here you can see inside the top of the box, and on the left side I have added one of the Gates from the small fence and gate set, which I embossed in an aged Silver tone. I placed some white, aqua and turquoise flowers in the box behind the gate and added a metal sign sentiment on top. In the middle of the window I placed some resin frames and added my initial.  To the right are some white resin cameras backed by some white doilies. In the far right corner, I placed a small clock button.
 Below, you can see a frame I have altered and added a vintage photo of myself on my 5th Birthday! I have also added the word "Dream" from the Words and Phrases 1 Set. I added some flowers and a camera charm to the top and placed 2 of the intricate doilies on the side and top of the frame. To the right of the frame is a metal camera which I altered using some Patina Guilders Paste, and added a flower to the center. I added a fun metal tap and pipe to the bottom on top of some vintage lace.

 Below, you can see the bottom right of the shadow box.  I have added a steam punk doily and a large wing from the Wings Assortment Set, which I have embossed with shabby blue and aged silver embossing powder.   I added a wooden sentiment and flowers to finish it off.
I hope you have enjoyed looking at my Window Shadow Box, and thanks so much for stopping by today!

Gina's Designs Items Used

Other Items Used
Tim Holtz Distress Paint Picket Fence
Wild Orchid Crafts Flowers
Petaloo Flowers
Prima Resin Cameras
Melissa Francis Resin Frames
Teresa Collins Memorabilia Paper
Prima Junkyard Findings Metal Tap
Michaels Photo Frame and Metal Camera
Patina Color Gilders Paste
Stampendous Embossing Powder in Shabby Blue and Aged Silver
Wooden Memories Sentiment from WhichCraftDoYouDo? on Zibbet
Lace from my Stash


Next up is Heidi with a gorgeous altered canvas featuring our Queen Anne's Lace chipboard shapes.

 Hello everyone, Heidi here!  Today's project is a canvas I made for Gina's Designs using the gorgeous Lace Flowers.  To start the project I used the honeycomb grid to put some medium randomly on the canvas. 


 I then painted the entire canvas with a light gray paint, going back to add a little mustard to the medium spots (these areas were dry within an hour or two).  I painted the lace flowers with paint and then I used some medium to give it a little depth along with some glitter.
  
Here is a little closer picture of the flowers.  I have them lifted off the page to give the entire canvas some depth.  The glitter is actually very fine and all over the entire canvas.  The effect is so pretty but it was hard for me to get a good photograph.

Gina's Designs


Thursday, February 27, 2014

An Altered Tin by Nancy and an ATC shrine by Veronica

First up is Nancy with an altered tin.


Hi everyone, Nancy here!  I might be rushing the season just a wee bit, but when Gina designed these new mermaids, I simply couldn't wait to have some fun with them.  I'm calling this piece a mermaid aquarium.  The mermaids are available as a set of 12 in varying sizes.  I used the 4 inch size thinking I'd start small then once it gets closer to Summer, I can go much bigger with a 12 x 12 canvas project.  For this fun project, I used a tin I'd had in my stash for a couple of years.  It's a little bit larger than an altoid tin at nearly 4 x 6.  I used mod podge to apply Japanese lace papers to the tin for texture, used ink sprays in ocean colors, then coated it with clear glass bead gel.  I painted my mermaids with twinkling H2O's and then applied glass microbeads over a coating of glossy accents.  I also used our new catweed shape in the background, a clump of chipboard grass at the bottom, and a section of palm tree at the top for some extra tropical appeal.  Everything else I used was already in my stash.  My favorite part of a creation is looking through my stash to find things that are perfect, and it's so exciting when I find just the right pieces.  I wanted it to look like an aquarium so I found various wood pieces to create a stand.  I hope you like it!


Gina's Designs Products Used:


Other Products:
Glass bead gel
Prima Lady Bird flowers
Japanese Lace papers from Dick Blick
Ink Sprays
Wooden decorative elements from Hobby Lobby
Gilder's Paste
Twinkling H2O's
Glass microbeads
Butterfly by Renea Bouquets on Etsy


Next up is Veronica

Hello Everyone!  It's Veronica here and today I want to share a project from Gina's Designs!  Her ATC Shrines are so much fun to decorate, and truly make wonderful gifts for any occasion! 
The ATC Shrine that I chose is titled Time.

 Mine is a simple project, but the possibilities that you can come up with on any one of Gina's ATC Shrines is endless!
 They all have a small door to open.....so cute!
 Just the perfect size to store your ATC's or, just simply decorate like a tiny shadow box, as I've seen many others who've bought these do.
 Peek - A- Boo! Says the little mouse! He has to figure out how to open the small door to get to his cheese set up on top!
Thank you for taking a look. I truly had fun with this one! It was so simple to complete an over all finished look!  You can always keep adding to make it more decorative, but sometimes I prefer a simpler design.


Old scrapbook paper in my stash of many!
Americana Acrylic Paint - Buttermilk
Radiant Rain Shimmering Mist Spray - Pearl Green.
 Beacon 3-in-1 Glue

Wednesday, February 26, 2014

A Canvas by Kathi and a Layout by Melissa

We have two gorgeous layouts to share today.  Kathi is up first with her mixed media layout created on a canvas and by following our February sketch challenge.  You can find the monthly sketch challenge in our gallery in the categories section located at the upper right of the gallery home page.  Play along for the chance to win a $10 gift certificate to the store.  Winners are chosen randomly by drawing.  Watch for a new sketch displayed on the first Monday of each month right here on the blog.

Hello, Kathi here wishing a very happy day to everyone!!! I am so glad that you have decided to drop by today and would love to see you here everyday! We enjoy showing you the many ways we use the gorgeous products from the Gina's Designs.


I created this canvas following our February Sketch Challenge, I had a lot of fun creating the canvas by prepping the canvas then using the Texture Sheet as a mask.  In the following video, I will show you how I created the canvas. Enjoy!


Video


Thanks for visiting today.  Come back soon to see more of my creations as well as creations by the rest of the Design Team.


Gina's Designs Products Used:

Other Supplies Used:

Graphic 45 French Country paper
Lindy's Stamp Gang Starburst spays
Grab a Guy Gold
Tiger Lily Red Orange
Lindy's Stamp Gang Flat Fabio Sprays
Sandra Dee Sepia
  South Shore Sand
Prima flower Spray
Venice Lace Trim


Next up is another gorgeous layout by Melissa.

Melissa here with a layout featuring Gina's Designs Lasercuts.  For my layout I chose this beautiful French advertising image.  I thought the chipboard elements nicely complemented and framed this feminine image.  I painted the chipboard in subtle tones of pink and gray to compliment the colors in the image.


Gina's Designs chipboard used:
Fanciful Elements

Other products used:
Pink Paislee paper
Lumiere paint
Twinkling H2os
Prima Bling
DCWV paper


Tuesday, February 25, 2014

An Altered Glass Bottle by Marfa and a Layout by Mary M

We have two projects on the blog today, and first up we have Marfa to share an upcycled item.
Hi everybody, I'm Crafting Marfa, and I want to show you my latest altered project for Gina's Designs.  I love to re-purpose things because I'm one of those people who believes in conservation.  If I can save something from going to the trash, I will.  This glass bottle came full of scented oil.  Once the oil was used up I knew that I wanted to keep the bottle but I just didn't have the right project for it.  This month, with all the love and Valentine's projects around, I was suddenly inspired.  This is a Design Team project created for Gina's Designs and it now decorates my bathroom.  It was very easy to put together.  I used a gold paint pen to add some nice gold accents to the bottle and to the typewriter letters.  I also covered the wooden key with the gold pen and hung it inside the bottle.  I glued everything with hot glue.  This is a decorative bottle, so hot glue works fine.  If you plan to handle this bottle often, then I suggest that you find a sturdier type of glue.   So look around your house and find some bottles that you might otherwise throw away and give them a second life.
Gina's Designs Supplies:


Next up today is Mary with a layout.  Mary has used lots of technique on this one.

Hi everyone it's Mary with a layout I created using the February Sketch Challenge as well as my beautiful niece for inspiration.

The mask was embossed with black embossing powder and then while it was still hot, I sprinkled glitter over the top of it.  All the flourishes are painted with a custom paint color I made and sprayed with Lindy's Stamp Gang sprays.
Yes, this butterfly is one of Gina's chipboard pieces! Before the gesso was dry, I gently bent the wings up, sprinkled it with several colors of fine glitter, and then glued it on top of a metal butterfly.

I used a script stamp on the flourish to the left.

Thanks for stopping by Gina's blog today. For more information on how I did this layout, please stop by my blog HERE.

Gina's Designs Products

Other Products
Paper: K&Company Value Pack
Glitter: Martha Stewart: Lapis Lazuli, Aquamarine Crystal, Turquoise, Florentine Gold
Paint: Folk Art:Brilliant Blue & Craft Essentials:White
Feathers
Lindy's Stamp Gang: TiffanyLou Blue, Blue Hawaiian Blue
Metal Butterfly: ButterBeeScraps
Embossing Powder: Ranger:Black

Monday, February 24, 2014

Mardi Gras Mask by Shanna


Hi everyone, Shanna here and the Mardi Gras celebrations have started.  I am so excited today to share a mask that I made for Gina's Designs. There is a ton of mask inspiration over on the blog that showcases the design teams creations so stop by the blog and check out all the new fun creations we have all been making! 


I will say I was thrilled when I was told we all had to create with one of these masks this month as Mardi Gras is coming up really fast.


I will say I am not really into the bright golds, purples, and greens. Although you will see a bright Mardi Gras mask coming up soon on my blog as I had to branch out. 


I really love silver not gold (I think is is due to my gold allergy to jewelry). But I love how elegant and classy this mask turned out. I tried hard to find a matching big bling to go in the middle and really set the mask off so I may make some more adjustments when I find that right piece. 


Items Used:
Gina's Designs Chipboard

Sunday, February 23, 2014

Altered Projects by Heidi and Deann

We have two projects to share on the blog today.  First up is Heidi.


Hello, Heidi here!  I had to share one more Valentine Project that I did for Gina's Designs.  This is my valentine box- used to collect valentine's at work.  It is actually a tangerine crate that I covered with white paper and then pink heart embossed paper.  I used a variety of the Gina's Designs Valentine chippies.
  
On the far left I have used a little pink heart and another white heart from the Cupid Shape Set. On the front of the box is a solid heart and then a white double heart(Valentine Shape Set).  All my chippies were painted with spray paint. 
Then there is the little cherub, painted white and he is shooting hearts that I painted in variegated pink and red paints.  In the background you can see the two pink/white straws holding up the doily with a couple more hearts.   This was definitely a hit! 

Gina's Designs Products


Next up is Deann.

Good Morning , Deann here with a DT project for Gina's Deaigns.
I started with a paper mache book box that I found at JoAnn Fabrics .
I covered the outside of the box with a brown paper bag that had vintage adds printed on it.
Next I tore a piece of corrugated cardboard to fit most of the top. I painted it with gesso then rubbed Vintage photo distress ink to the raised areas and sprayed all of it with 
Iridescent Gold Glimmer Mist.
On top of the corrugated cardboard I used a piece of the Mad Tea Party paper
from Marion Smith.
Once the base of the box was done , it was time to add the goodies !
Lots of leaves and flowers. A little lace and lots of Chip board pieces.
I'll have a list of all the chip board I used at the end of the post.


 Thanks for stopping bye :)
(((HUGS)))
Deann
Gina Designs Products used :

Saturday, February 22, 2014

Sweet Summer Scrapbook Layout

Good morning, everybody!  I know that most of you are very cold brrrr...so I want to bring you a reminder of summer, hot days, the beach, ice cream...yum!  These are photos that I took last year.  There's Larry and me in the Florida Keys, and one of the biggest soft served ice cream cones that I've ever eaten!  Nothing like a delicious ice cream cone to cool you down on a hot summer day.  

For this layout I used the sketch for the challenge that we're running monthly over in the Gina's Designs Gallery.  It was simple as pie to make.  I used Copic markers to color the chipboard pieces, then I covered most of them with Triple Thick glaze.  I especially love how the chippie ice cream cone turned out. A few red rhinestones were the perfect little accent to frame the page.


Supplies List:

Gina's Designs Chipboard Set:  Sweet Summer Shape Set

Other Supplies:

Triple Thick Glaze
The Denim Stack Paper by DCWV
Copic Markers
Rhinestones

Friday, February 21, 2014

Couture Boutique Mini Album by Kim

Hi Everyone!  It's Kim here, and today I'm sharing my Boutique Mini Album. I have created this album using the Graphic 45 Couture Paper line and tons of Gina's wood and chipboard pieces.
On the cover I have styled the album to look like a vintage Ladies Dress Shop. This Album of Gina's certainly lends itself to being created this way! You can see below I have made an awning and window flower box out of chipboard to give lots of dimension to the front of the book. On the door that comes with the album I have embossed and decorated with more items from the paper. In the window box I used some of Gina's fern fronds, as well as on the top right corner of the awning, further adding to the 3D look. You can also see a lovely dress form featured in the window as well.
Below are the first two pages of the mini album. I have created a  interactive waterfall to place some photos or journaling. The next page features a large pocket, in which I used one of Gina's Tags, and Postage frames. I have also used one of the Stackable Labels on top of the waterfall feature to place a sentiment from the paper line. In the corners at the top of the page are another dress form from the Dressform Shape Set, and a Hanger from the Vintage Seamstress Shape Set.

Above you can see that I have decorated one of the manila tags with layers of different stamps in different color tones and then topped it off with a dress form stamp and spool in black ink.  The Postage frame behind the tag was embossed and features a photo from the paper line, on which I used glossy accents and then added some tiny micro beads for texture.
 
 This page above features a folded photo mat and tag envelope, with some wood sentiments and flowers from my stash.

 Above here you can see a Flip Photo Mat section with chipboard pieces, lace and wood sentiment from my stash. Below I have created this page with one of the Dream Frames from the Delicate Frame and Ornament Set, 2 photo mats and another of the Postage Frames.

 This page below features another Postage Frame, and dress forms decorated to match the page. I have also created a pocket with some cut outs from the paper.

 
Above here is another page from the album featuring another Postage Frameintricate doily and cottage window. The top left is a fold down photo mat, and the bottom left is an envelope to keep photos or journaling tags in.
Below is the last page of the album and is one of my favorites. I love the colours!
Back of the Album
I hope you like my mini album, to see more photos, please visit my blog.
Thanks for stopping by today!

Gina's Designs Items Used

Other items used
Graphic 45 Couture Paper
Stampendous Aged Sliver, Shabby White, Aged Teal Embossing Powder
Ranger Fine Black Embossing Powder
Wild Orchid Crafts Flowers
Petaloo Flowers
Craftsupplies1 Flowers
Prima Chipboard Welcome to Paris Set
Seam binding & Lace from my Stash
Maya Road Paper Cameras


Thursday, February 20, 2014

An altered frame in a vintage shabby style

Hi everyone, Nancy here!  I created this altered frame as a gift for my friend.  Before I mailed it to her, I added this photo of my paternal Grandmother.  She passed away when I was young but I still remember how we used to sit outside in her yard and enjoy the sunshine.  I began with a 12 x 12 unfinished frame from Michael's.  I have altered several of these, and they are so much fun to play with as each one comes out so different.  This one I decided to paper instead of paint, but also did some stenciling with paint over the paper for a mixed media effect.  The project came together quickly and easily with some Gina's Designs chipboard shapes and some flowers.  I hope you like it!


Gina's Designs Products Used:

Steampunk 2 Shape Set (pocket watch)

Other Products:
Petaloo Flowers
BoBunny "The Avenues" Design Paper
TCW Damask Stencil
Folk Art Paints
Prima Chalk Inks
Tim Holtz Distress Embossing Powder
Prima Butterfly
Bo Bunny Trinket


Wednesday, February 19, 2014

Mardi Gras Layout by Kathi and some ATC's by Melissa

Today we have two projects to share.  First up is Kathi with an inventive way to use the chipboard masks that you have seen decorated this month by all of the Design Team members in celebration of Mardi Gras.

Hi everyone, Kathi here, thanks for joining me today,  I have created  a 12 X 12 layout using one of the new masquerade masks  from Gina's store..  The masks come in several shapes and are ready to decorate.


I added two of the smaller masks as photo mats. I added the paper to the mask and the ran it through the big shot with an embossing folder.  I sanded the raised area's and used Lindy's Stamp Gang spray on the lace. I added feathers beads & flowers to the left top of the mask, and I shaped the mask raising the nose area. I added a very thin paper flower laser cuts (from Korea) A gift from my mother-in-law 30 years ago. 


I hope you liked my project today, thanks for stopping by and don't forget to visit Gina's Store.

Supplies used: Gina's Designs:
Masks Shape Set

Other supplies used:
Graphic 45 paper
Feathers
WOC flowers
beaded trim from Suhafuha
Martha Stewart Punches
Tim Holtz embossing folder


Next up is Melissa with some gorgeous and unusual ATC's.

Hi everyone, Melissa here.  One reason I find the chipboard such a pleasure to work with is their versatility. I can change their original theme to fit which ever one I want.


Gina's Designs chipboard used:

Tuesday, February 18, 2014

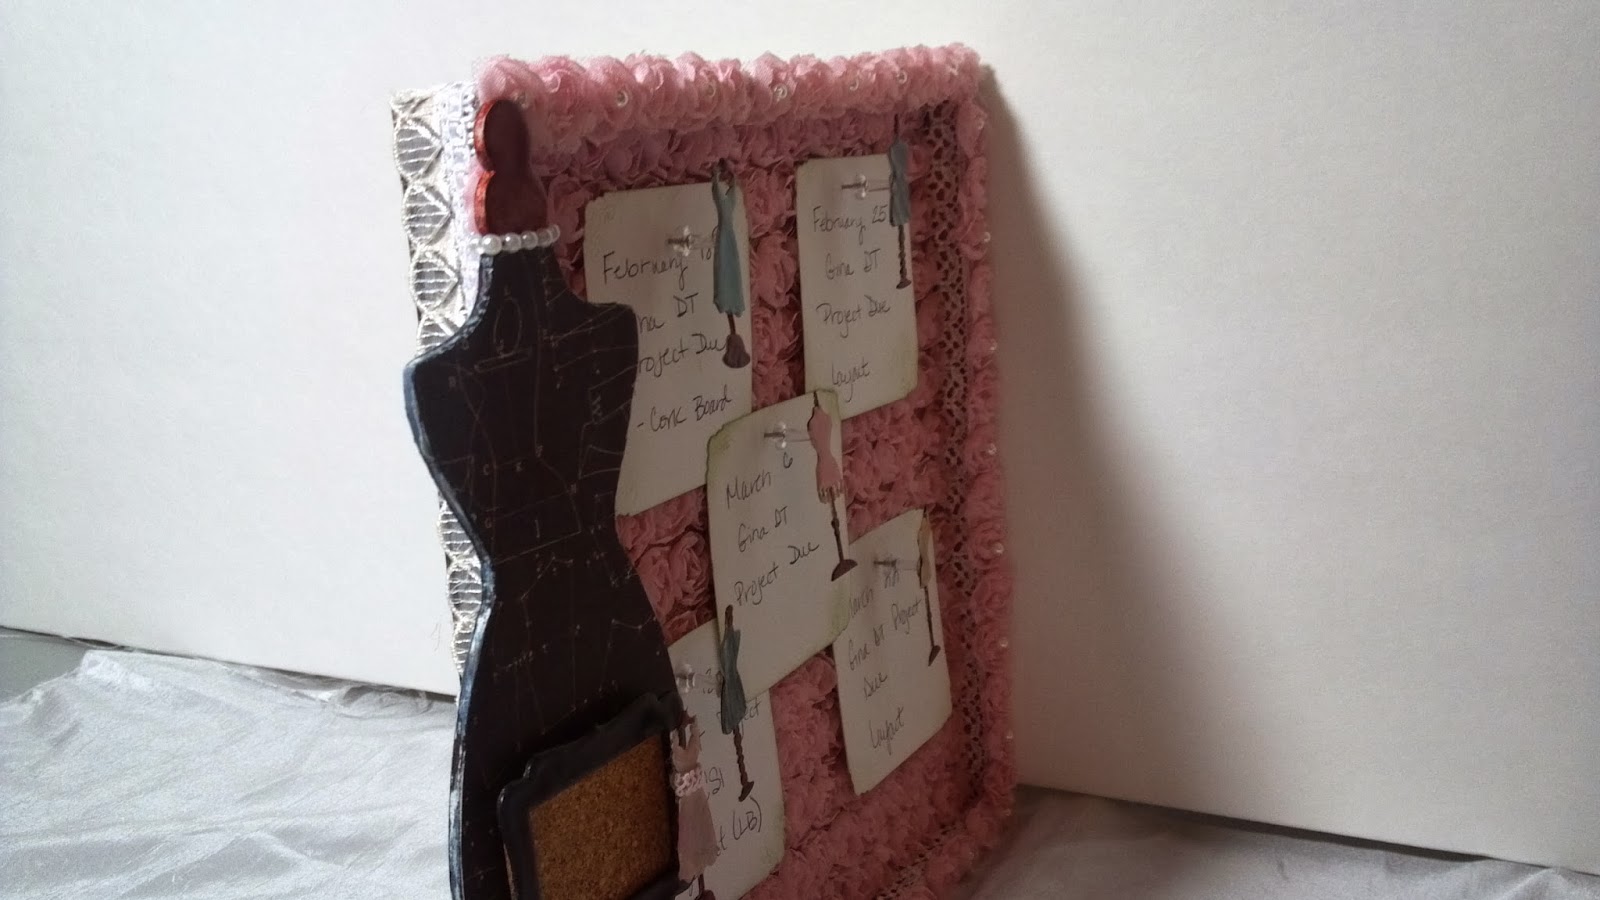
Dressform Cork Board by Mary


 Happy Tuesday! Mary here with my latest DT project for Gina's Designs. I have made a cork board  to keep track of my DT project due dates. I used the box portion of the Doily Box SEW since I used a lot of the elements that came with it on my Couture Shop project. After a good coat of gesso, I actually papered the inside and outside sides with Couture Shop by Graphic 45. 
 And then I changed directions! I covered the sides with lace and trim from my stash. On the inside, I covered it with a piece of cork board and then some rosette lace I got on Zibbet.

I used gesso on all the dressform pieces and colored them with marker before applying clear embossing powder to the miniature ones. I attached five of the mini dressforms to thumb tacks I had.
 The larger dressform (which is designed to be free standing) is covered with a piece of paper from the Couture Shop. On the larger dressform I attached a mini cork board that I made from one of the frames that was in a "thank you for order" from Gina. I attached one of the miniature dressforms to it.

For more information and pictures, please visit my blog HERE.

Thank you for stopping by the blog today!


Gina's Designs
Frame - thank you gift for past order

Other Supplies
Lace: CraftSupplies1, Suhafuha, My Stash
Flowers: Lavish Laces, CraftSuplies1
Markers
Clear Embossing Powder
Cork Board
Loose Pearls
Pearl Trims: CraftSupplies1
Paper: Couture Shop by Graphic 45


Related Posts Plugin for WordPress, Blogger...