Tuesday, December 31, 2013

Altered Christmas Box by Rashida

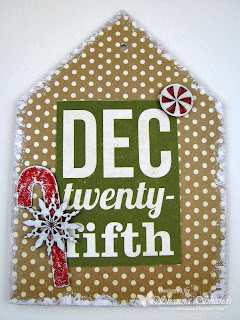
Hello Rashida here. Today I’m sharing my altered Christmas box. This year I’m giving handmade. Not only is it inexpensive but handmade gifts also show how much you really care. I found this cute box at the thrift store for only thirty cents! I added chipboard pieces from Gina’s Designs, ribbon, Christmas picks from Michaels and a $1.00 sticker from Hobby Lobby. I love the way it came out. I plan to fill it with candies and sweets for my best friend.


Gina’s Designs Products

Other Products
Box
Ribbon
Stickers
Christmas picks
Gemstones
Paint
Modeling paste
Glitter

Monday, December 30, 2013

Christmas Composition Box

Good morning everyone :) Deann here with a Composition Box from Gina's Designs
( Available in January ) 


 The box comes with 3 smaller boxes, a key and the number 25.
Gina will also have these awesome Boxes in other themes!
Sweet 16, Valentine, St. Patrick's Day and lots more !


I painted the 25 and one of the boxes red and the rest of the boxes and the key gold. 


I used the MMI Christmas paper. 


Side view of the box.
Thanks for looking everyone ! As soon as the Composition Box is in the 
store I'll add the link :)
(((HUGS)))
Deann  

Sunday, December 29, 2013

Lorena Angel Canvas

Today is my last official post for Gina's Designs. My year tenure on the Design Team has come to an end. The products that were released this past year are amazing. The selection and quality for the price is unmatched. The online store has chipboard shapes, albums, and my favorite - the "off the page" selection - which includes everything from frames, trays, shadow boxes, books, clocks, storage and so much more.

Today I am sharing a wall hanging kit that I turned into a canvas. The kit comes with the corrugated board, chipboard words, hearts, and keys. The only items in the kit that I didn't use were two pieces of chipboard background, since I was using the canvas I didn't need them.

The chipboard shapes are painted with gelatos and distressed crackle paint. The chipboard words are colored with Mister Huey's color mist and accented with Tim Holtz distressed paint.

Happy New Year!
Dawn Rene

Lorena Angel Canvas - Designs By Dawn Rene

Lorena Angel Canvas - Designs By Dawn Rene 2

Lorrenna Angel Canvas - Designs By Dawn Rene 1
Gina's Designs Supplies
Flying Heart Wall Hanging

Other Supplies
Paper: BoBunny - The Avenues
Ribbon: Lovebug Creations Ribbon and Mesh, Pink Paislee - Zig Zag Ribbon
Inks and Paints: Faber-Castell Gelatos, Distress Crackle Paint - Clear Rock Candy, Tim Holtz Distressed Paints - Picket Fence, Tattered Angels Glitter Mist - Valencia, Mister Huey's Color Mist - Classic Tan
Embellishments: Eyelets
Other: Gesso, Molding Paste, Stencils

Saturday, December 28, 2013

Precious by Heidi


 Hello Everyone, Heidi here!  I hope you had a wonderful holiday!  Today I'm sharing a layout using a few fun items from Gina's Designs.  When I got these cottage windows I knew I had to create a page using them.  Although it is far from wintery, or Christmas"ish" I just had to share it today.

The paper is from my stash and is a ruled design but done in pink (of course my favorite color, right?)  I thought it would be ideal for a little girl's picture or a baby picture, which I did not have either of.  I thought against putting my boys pictures in the window.  Ha ha!  
I just love the little sentiments now available at Gina's Designs!

Gina's Designs Products:

Friday, December 27, 2013

Free Calendar Printable 4

In keeping with our dictionary page printables, we have a 2014 calendar for you.  This calendar is made to be decorated in your own style.  Use it to create a themed calendar or jot notes and add photos all year long, then bind it into a memory album.  Use it on a clipboard, spiral bind it or use clips or rings.  These printables have so many possibilities.  Each Friday in December you can download 3 months of the calendar. 


If you prefer the pdf file you can download it here:  2014 October - December

Thursday, December 26, 2013

Fairy and Flourish Trinket Box

Fairy and Flourish Trinket Box
Today we have Melissa with her second project as guest designer for the month of December.  We love her use of textures and different mediums. Look for more of Melissaa's creations as she joins our team for 2014!  Here's what Melissa told us about her project:

To begin I painted this wooden trinket box with gesso, then Twinkling H2os, and then brushed on some silver Jaquard mica powder. I put texture paste onto a cardstock doily. I painted with more H2Os. I painted over gesso on the fairy and flourish, used H2Os,then a layer of crackle,then more paint to bring out cracks. Then another layer of crackle. I put the chippies on, then the the little border curls.The curls I painted with liquid pearls. Then I embellished with things. The thought of making something I could put stuff into was interesting to me,  rather than a layout that I put in a pile with the rest of them. 


From Gina's Designs;
I used the parts you punch out from the Fanciful Fans for the curls on the borders.

Other products I used;
Stickles
Glossy Accents
Diamond Glaze
Moonstones, citrines, amethyst,two tiny sterling leaves, sterling earrings on sides of box.
Swarovski bicones, flat backs, and a fancy one on the right I don't know the name of.
Purple Square bling and sequins from Abbygirl.
Center of Tim Holtz metal flower is from my sis.
Jaquard Mica Powder
Ranger alcohol ink
Vintaj connectors on left and right sides of box
 Lumieres
microbeads

Wednesday, December 25, 2013

Joy Word Tree with Marjolaine

Merry Christmas  friends!

I hope you are having an awesome day! Marjolaine here with a short post to show you what I have done with the word tree.


I used silver Zing embossing powder to cover the tree, stringed some blue beads, added some bling, flowers, a few snowflakes and ribbon and my tree was ready to be displayed with the rest of the decorations.

Products I used from the store:

Happy holidays everyone!

Tuesday, December 24, 2013

Up Up & Away Garden Wall layout

Kathi here again with a new layout to share.  I've used several of our chipboard shapes on this one.

To begin, I applied some dry wall paste using the Brick Wall as a mask to create a brick wall on the left side of the layout.  I used a lace mask on the right side of the layout.  I placed a filmstrip laser cut from the Hollywood Shape set on the lower part of the layout as a border, then applied flowers to the wall, peeking out from underneath the gate.  The gate, from our gate shape set,  was prepared with Distress embossing power.

The Hot Air Balloon was left uncovered to be seen through the brick wall.
A Hot Air Balloon from the Hot Air Balloon Shape Set was decorated and placed on the upper right of the photo.
Close up of filmstrip border & lace pattern.

Close up of large gate

To Finish off the layout, I used the word Sweet from the Words & Phases II Shape Set. 

Supplies used from Gina's Store are:

Monday, December 23, 2013

Gingerbread Mini Album by Shanna

Hi everyone. Shanna back again to share a fun holiday mini that I made!

But before I get to my creation I would love to tell you quickly about a chance to win a $25 gift certificate to Gina's Designs.

GIVEAWAY ALERT!!!!!

 We would love to reach 500 by January 1st. So if you already like Gina's Chipboard Design's then you are already in for the draw, but we have to make it to 500!!!! So tell you friends they have a chance at a chippie spree for your chance to win! 

I am so excited to share as some of the team has already shared their wonderful take on this fun mini album. 

Warning - PICTURE HEAVY


Items Used:
Stickles
Sparkle N Sprinkle EP and Glitter
Gesso
Distress Ink
Snow Cap Ink Dabber
Glossy Accents
Puffy Paint

Also did a little video in case you want a little more detail.


Sunday, December 22, 2013

Memo Board by Rashida

Hi it's Rashida here today sharing this Memo Board from Gina's Designs.  I wanted to show you that there are many uses for the items on the website. I decided to turn my memo board into a magnetic calendar, creating a beautiful and useful piece of art. . I painted the entire piece in brown and then I added a magnetic sheet. Next I placed DCWV paper over the magnetic sheet. I used stickers on pattern paper backed with magnet to create the month and numbers. I then used hand painted flowers from my stash to further embellish.  Thanks for looking. 


Gin's Designs Products Used:


Saturday, December 21, 2013

SnowFlake Door Hanger

Hello everyone, Veronica here!  Today I am sharing a door hanger that I made as a Holiday gift.  Lots of glitter, sparkle, and of course love went into making these.
This was truly a simple project. The most time was spent on creating all the cone shapes from an old book that I got from a thrift store years ago. I got this idea from Pinterest, and I knew that Gina's Chip Board Snowflakes would fit perfectly!

I love anything with writing on it. I'm always on the hunt for old vintage papers to work into my crafts.
After stapling and gluing all the paper cones together, I made the yoyo out of a calico material in a winter frosty blue color.
I added snowflakes from Gina's Designs, painting them first, then immediately sprinkling golden glitter all over the snowflake so it would stick before the paint dried.
The letter was done the same way, but with a finer soft glitter that I got at my local craft store.
Thank you for stopping by and taking a peek.
May everyone have a Blessed Holiday.

Friday, December 20, 2013

Free Calendar Printable 3

In keeping with our dictionary page printables, we have a 2014 calendar for you.  This calendar is made to be decorated in your own style.  Use it to create a themed calendar or jot notes and add photos all year long, then bind it into a memory album.  Use it on a clipboard, spiral bind it or use clips or rings.  These printables have so many possibilities.  Each Friday in December you can download 3 months of the calendar. 


If you prefer the pdf file you can download it here:  2014 July - September

Thursday, December 19, 2013

There really is a Santa Claus!

Hi Everyone!  It's Nancy here with a layout featuring my Frankie.  Here he is watching in amazement as Santa crosses overhead on Christmas Eve.  I began with some BoBuuny design paper and applied some Japanese lace paper with gel medium over the center to create the look of swirling snow.


Gina's Designs Products Used:
Santa and Sleigh Shape Set (available soon or by request)
Other Products:
BoBunny Design Paper (Blitzen Collection)
Japanese Lace Paper (available online at Dick Blick art supplies)
Prima Vintage Trinkets (resin bird)
Prima resin lamppost (shabby chic treasures)
Prima say-it-in-crystals bling
Flowers by Prima and Petaloo
Prima Junkyard findings (zipper)
glossy accents
glitter glue
The moon image was found online and printed out


Wednesday, December 18, 2013

The Couture Shop by Mary

Hi everyone, it's Mary here. I can't believe that Christmas is only seven days away! Today I have a configuration style design made from the Bagatelle Boxes: Starter Kit. These boxes are great! You get 12 in the kit (two of six different sizes) and once you have the boxes assembled, you can attach them in any arrangement you like.
I had so much fun with this project! I used the new "Couture" papers from Graphic 45 to line the inside and the outside of the boxes. I also used the paper on the wooden dress forms that will be available in the store in 2014!
 I used several items from the Doily Box: SEW collection. The needle was embossed with silver embossing powder.


Here you can see the doily and sewing machine from the Doily Box: SEW collection. The sewing machine, hinge (Hinge Shape Set) and filigree frame (Filigree Frames Shape Set) are all make from chipboard. These pieces were all embossed with embossing powders. Just a tip when embossing, if you are using a light color or want the true color of the embossing powder, gesso first. I cut the filigree frame in half and attached one of the images from the paper line to it before attaching it to the side of the box. 

Here are two more of the chipboard pieces from the Doily Box: SEW collection. The "sew" was given a serious workout. I had some embossing issues, but after four times under the heat gun, I got it right. The chipboard did not fall apart or warp on me. I then attached it the the blue embossed chipboard frame. You can also see a mirror in the corner. This came from the Parisian Shape Set. It comes in two pieces so it was easy to emboss the "glass". The base of the mirror was inked and then coated with glossy accents to give it that high polished look.


I love how this chipboard scissor turned out! The handle is black and the blades are silver embossed. I added a brad to the center.  They tuned out darling!


Here you can see the chipboard zipper, dress form and button (the dress form is sitting on it). The zipper and the dress form were all embossed. The button has a piece of the paper attached to it. The dress form is on a stand, but I cut it off and attached her to the button. I love that I can alter the pieces to fit my designing needs!


Thanks for stopping by the blog today!  I hope you all have a great holiday season!


Items Used From Gina's Designs
Bagatelle Boxes Starter Kit
Wooden Dress Forms (Available January 2014!)

Other Items Used
Graphic 45 - Couture - 8x8 and 6x6
Glossy Accents
Metal Key, Shoe and Filigree - ButterBeeScraps on Zibbet
Bling - Martha Stewart
Embossing Powders: Lindy's Stamp Gang, Tim Holtz, Stampin' Up!
Wooden Ruler - Prima
Flowers - Wild Orchid Crafts, Craft Supplies 1,
Thimbles - Metal and Wooden
Fabric and Laces
Bobbin
Pins
Related Posts Plugin for WordPress, Blogger...