Monday, February 24, 2014

Mardi Gras Mask by Shanna


Hi everyone, Shanna here and the Mardi Gras celebrations have started.  I am so excited today to share a mask that I made for Gina's Designs. There is a ton of mask inspiration over on the blog that showcases the design teams creations so stop by the blog and check out all the new fun creations we have all been making! 


I will say I was thrilled when I was told we all had to create with one of these masks this month as Mardi Gras is coming up really fast.


I will say I am not really into the bright golds, purples, and greens. Although you will see a bright Mardi Gras mask coming up soon on my blog as I had to branch out. 


I really love silver not gold (I think is is due to my gold allergy to jewelry). But I love how elegant and classy this mask turned out. I tried hard to find a matching big bling to go in the middle and really set the mask off so I may make some more adjustments when I find that right piece. 


Items Used:
Gina's Designs Chipboard

Sunday, February 23, 2014

Altered Projects by Heidi and Deann

We have two projects to share on the blog today.  First up is Heidi.


Hello, Heidi here!  I had to share one more Valentine Project that I did for Gina's Designs.  This is my valentine box- used to collect valentine's at work.  It is actually a tangerine crate that I covered with white paper and then pink heart embossed paper.  I used a variety of the Gina's Designs Valentine chippies.
  
On the far left I have used a little pink heart and another white heart from the Cupid Shape Set. On the front of the box is a solid heart and then a white double heart(Valentine Shape Set).  All my chippies were painted with spray paint. 
Then there is the little cherub, painted white and he is shooting hearts that I painted in variegated pink and red paints.  In the background you can see the two pink/white straws holding up the doily with a couple more hearts.   This was definitely a hit! 

Gina's Designs Products


Next up is Deann.

Good Morning , Deann here with a DT project for Gina's Deaigns.
I started with a paper mache book box that I found at JoAnn Fabrics .
I covered the outside of the box with a brown paper bag that had vintage adds printed on it.
Next I tore a piece of corrugated cardboard to fit most of the top. I painted it with gesso then rubbed Vintage photo distress ink to the raised areas and sprayed all of it with 
Iridescent Gold Glimmer Mist.
On top of the corrugated cardboard I used a piece of the Mad Tea Party paper
from Marion Smith.
Once the base of the box was done , it was time to add the goodies !
Lots of leaves and flowers. A little lace and lots of Chip board pieces.
I'll have a list of all the chip board I used at the end of the post.


 Thanks for stopping bye :)
(((HUGS)))
Deann
Gina Designs Products used :

Saturday, February 22, 2014

Sweet Summer Scrapbook Layout

Good morning, everybody!  I know that most of you are very cold brrrr...so I want to bring you a reminder of summer, hot days, the beach, ice cream...yum!  These are photos that I took last year.  There's Larry and me in the Florida Keys, and one of the biggest soft served ice cream cones that I've ever eaten!  Nothing like a delicious ice cream cone to cool you down on a hot summer day.  

For this layout I used the sketch for the challenge that we're running monthly over in the Gina's Designs Gallery.  It was simple as pie to make.  I used Copic markers to color the chipboard pieces, then I covered most of them with Triple Thick glaze.  I especially love how the chippie ice cream cone turned out. A few red rhinestones were the perfect little accent to frame the page.


Supplies List:

Gina's Designs Chipboard Set:  Sweet Summer Shape Set

Other Supplies:

Triple Thick Glaze
The Denim Stack Paper by DCWV
Copic Markers
Rhinestones

Friday, February 21, 2014

Couture Boutique Mini Album by Kim

Hi Everyone!  It's Kim here, and today I'm sharing my Boutique Mini Album. I have created this album using the Graphic 45 Couture Paper line and tons of Gina's wood and chipboard pieces.
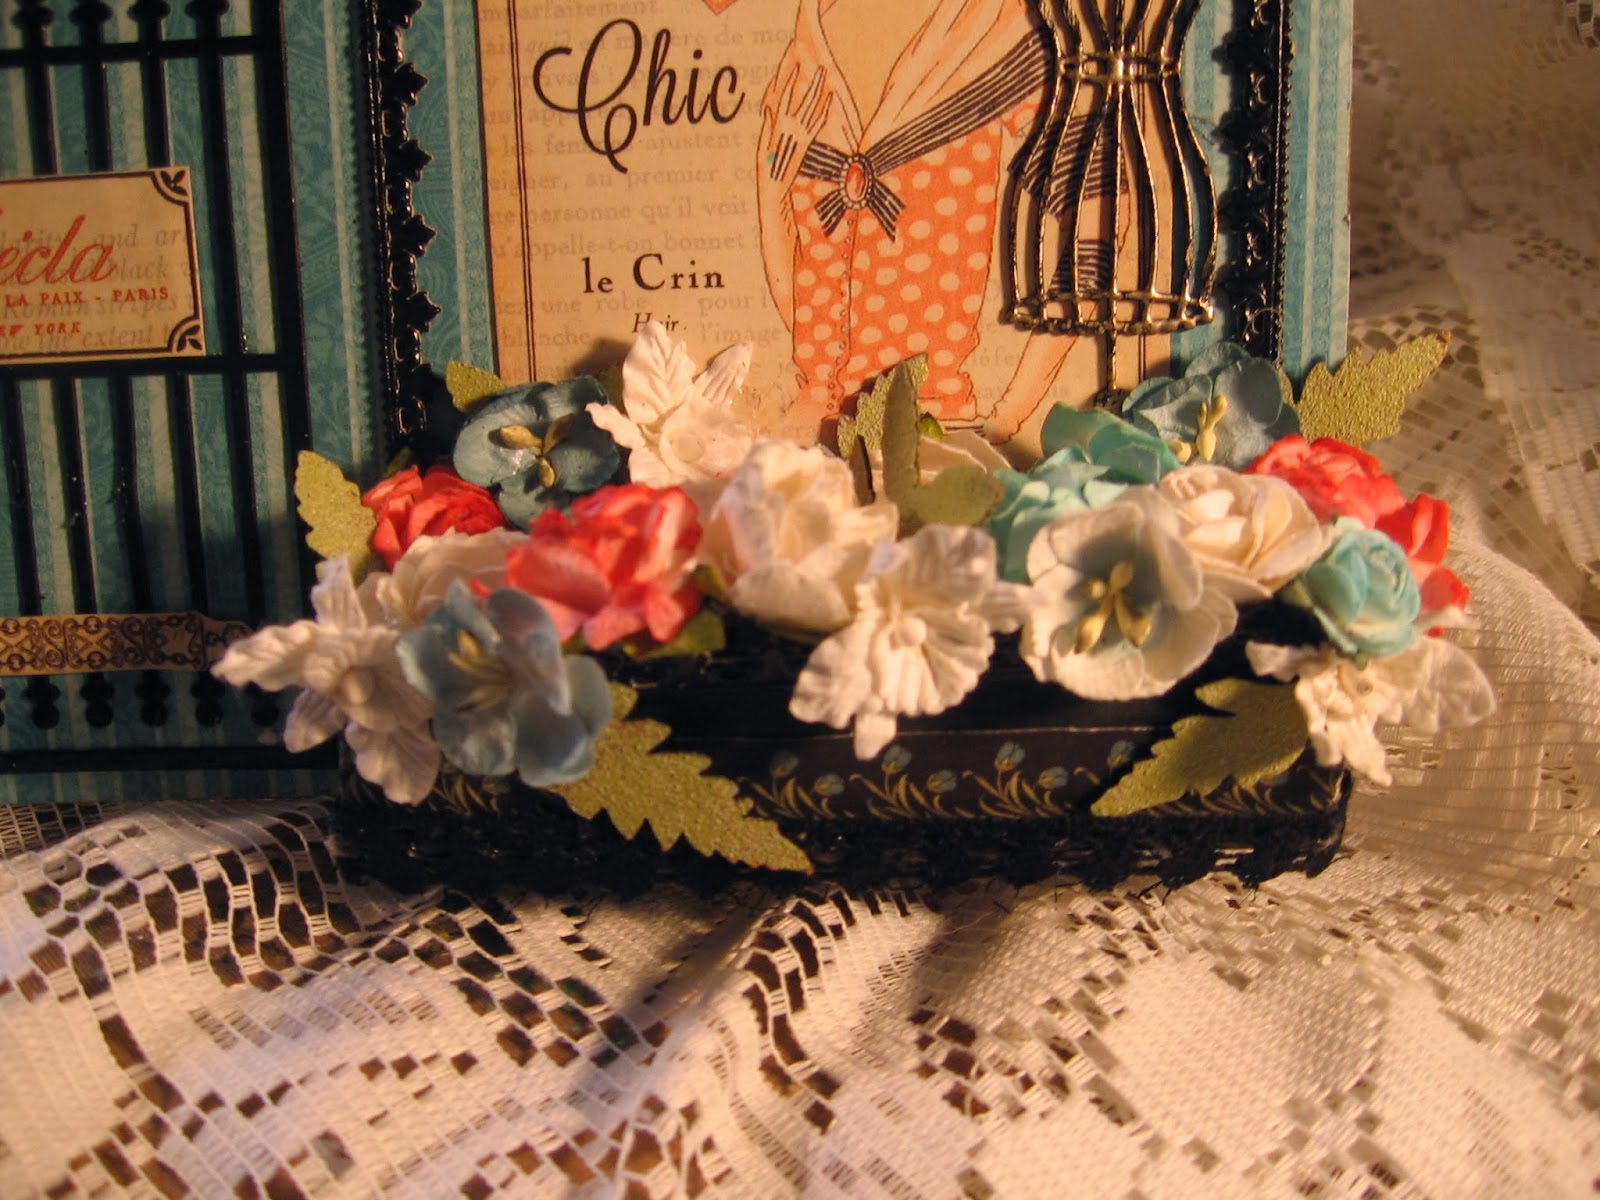
On the cover I have styled the album to look like a vintage Ladies Dress Shop. This Album of Gina's certainly lends itself to being created this way! You can see below I have made an awning and window flower box out of chipboard to give lots of dimension to the front of the book. On the door that comes with the album I have embossed and decorated with more items from the paper. In the window box I used some of Gina's fern fronds, as well as on the top right corner of the awning, further adding to the 3D look. You can also see a lovely dress form featured in the window as well.
Below are the first two pages of the mini album. I have created a  interactive waterfall to place some photos or journaling. The next page features a large pocket, in which I used one of Gina's Tags, and Postage frames. I have also used one of the Stackable Labels on top of the waterfall feature to place a sentiment from the paper line. In the corners at the top of the page are another dress form from the Dressform Shape Set, and a Hanger from the Vintage Seamstress Shape Set.

Above you can see that I have decorated one of the manila tags with layers of different stamps in different color tones and then topped it off with a dress form stamp and spool in black ink.  The Postage frame behind the tag was embossed and features a photo from the paper line, on which I used glossy accents and then added some tiny micro beads for texture.
 
 This page above features a folded photo mat and tag envelope, with some wood sentiments and flowers from my stash.

 Above here you can see a Flip Photo Mat section with chipboard pieces, lace and wood sentiment from my stash. Below I have created this page with one of the Dream Frames from the Delicate Frame and Ornament Set, 2 photo mats and another of the Postage Frames.

 This page below features another Postage Frame, and dress forms decorated to match the page. I have also created a pocket with some cut outs from the paper.

 
Above here is another page from the album featuring another Postage Frame,  intricate doily and cottage window. The top left is a fold down photo mat, and the bottom left is an envelope to keep photos or journaling tags in.
Below is the last page of the album and is one of my favorites. I love the colours!
Back of the Album
I hope you like my mini album, to see more photos, please visit my blog.
Thanks for stopping by today!

Gina's Designs Items Used

Other items used
Graphic 45 Couture Paper
Stampendous Aged Sliver, Shabby White, Aged Teal Embossing Powder
Ranger Fine Black Embossing Powder
Wild Orchid Crafts Flowers
Petaloo Flowers
Craftsupplies1 Flowers
Prima Chipboard Welcome to Paris Set
Seam binding & Lace from my Stash
Maya Road Paper Cameras


Thursday, February 20, 2014

An altered frame in a vintage shabby style

Hi everyone, Nancy here!  I created this altered frame as a gift for my friend.  Before I mailed it to her, I added this photo of my paternal Grandmother.  She passed away when I was young but I still remember how we used to sit outside in her yard and enjoy the sunshine.  I began with a 12 x 12 unfinished frame from Michael's.  I have altered several of these, and they are so much fun to play with as each one comes out so different.  This one I decided to paper instead of paint, but also did some stenciling with paint over the paper for a mixed media effect.  The project came together quickly and easily with some Gina's Designs chipboard shapes and some flowers.  I hope you like it!


Gina's Designs Products Used:

Steampunk 2 Shape Set (pocket watch)

Other Products:
Petaloo Flowers
BoBunny "The Avenues" Design Paper
TCW Damask Stencil
Folk Art Paints
Prima Chalk Inks
Tim Holtz Distress Embossing Powder
Prima Butterfly
Bo Bunny Trinket


Wednesday, February 19, 2014

Mardi Gras Layout by Kathi and some ATC's by Melissa

Today we have two projects to share.  First up is Kathi with an inventive way to use the chipboard masks that you have seen decorated this month by all of the Design Team members in celebration of Mardi Gras.

Hi everyone, Kathi here, thanks for joining me today,  I have created  a 12 X 12 layout using one of the new masquerade masks  from Gina's store..  The masks come in several shapes and are ready to decorate.


I added two of the smaller masks as photo mats. I added the paper to the mask and the ran it through the big shot with an embossing folder.  I sanded the raised area's and used Lindy's Stamp Gang spray on the lace. I added feathers beads & flowers to the left top of the mask, and I shaped the mask raising the nose area. I added a very thin paper flower laser cuts (from Korea) A gift from my mother-in-law 30 years ago. 


I hope you liked my project today, thanks for stopping by and don't forget to visit Gina's Store.

Supplies used: Gina's Designs:
Masks Shape Set

Other supplies used:
Graphic 45 paper
Feathers
WOC flowers
beaded trim from Suhafuha
Martha Stewart Punches
Tim Holtz embossing folder


Next up is Melissa with some gorgeous and unusual ATC's.

Hi everyone, Melissa here.  One reason I find the chipboard such a pleasure to work with is their versatility. I can change their original theme to fit which ever one I want.


Gina's Designs chipboard used:

Tuesday, February 18, 2014

Dressform Cork Board by Mary


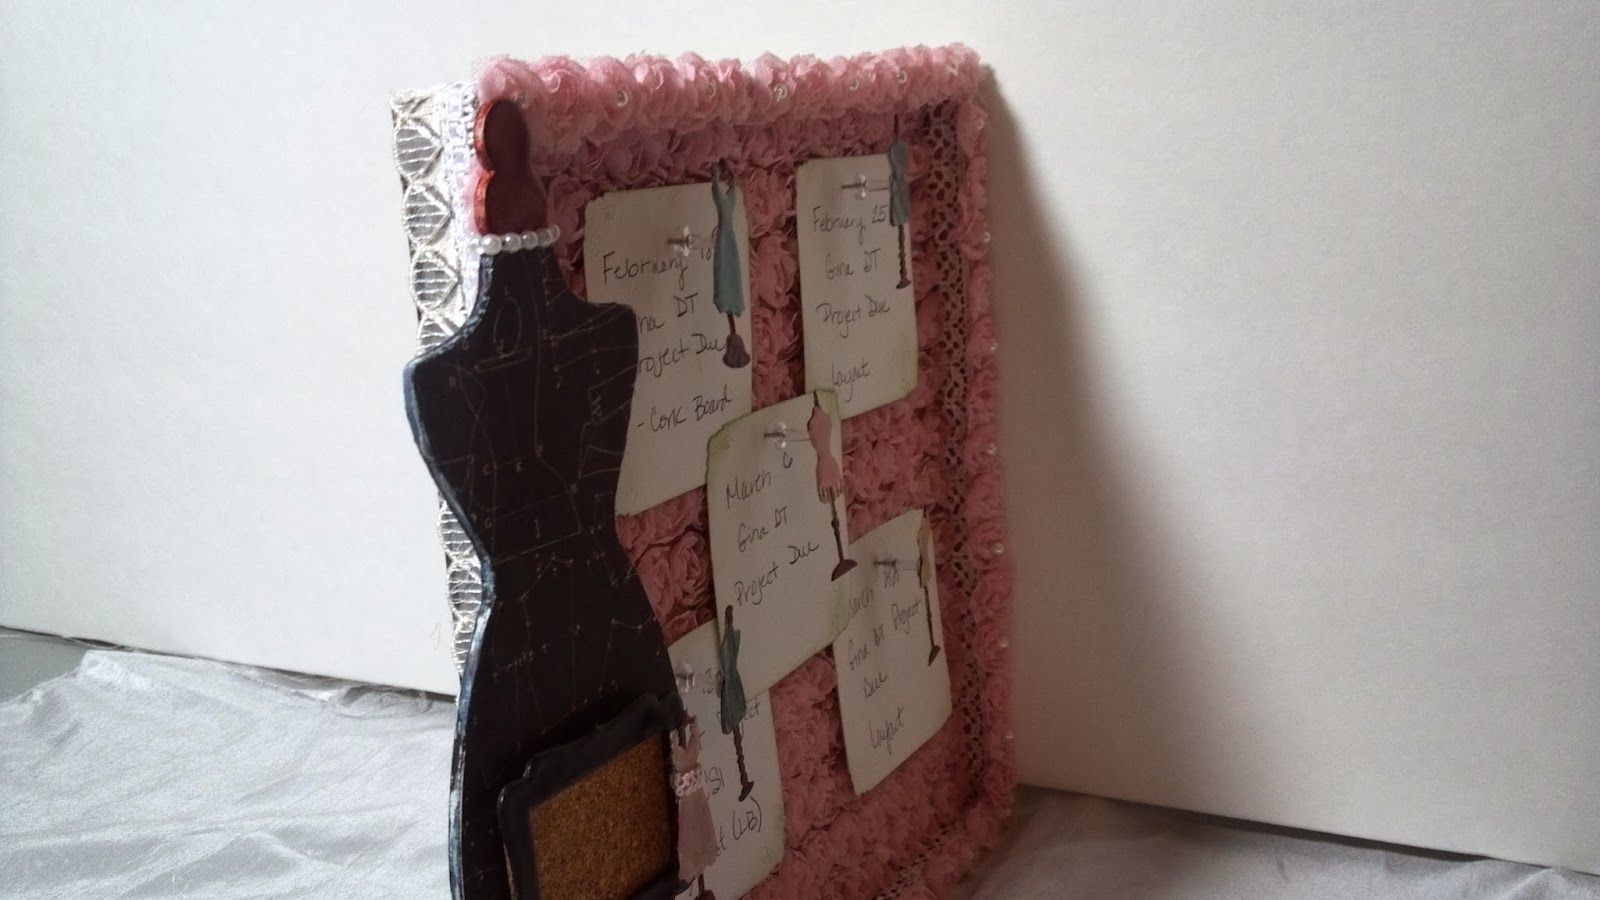
 Happy Tuesday! Mary here with my latest DT project for Gina's Designs. I have made a cork board  to keep track of my DT project due dates. I used the box portion of the Doily Box SEW since I used a lot of the elements that came with it on my Couture Shop project. After a good coat of gesso, I actually papered the inside and outside sides with Couture Shop by Graphic 45. 
 And then I changed directions! I covered the sides with lace and trim from my stash. On the inside, I covered it with a piece of cork board and then some rosette lace I got on Zibbet.

I used gesso on all the dressform pieces and colored them with marker before applying clear embossing powder to the miniature ones. I attached five of the mini dressforms to thumb tacks I had.
 The larger dressform (which is designed to be free standing) is covered with a piece of paper from the Couture Shop. On the larger dressform I attached a mini cork board that I made from one of the frames that was in a "thank you for order" from Gina. I attached one of the miniature dressforms to it.

For more information and pictures, please visit my blog HERE.

Thank you for stopping by the blog today!


Gina's Designs
Frame - thank you gift for past order

Other Supplies
Lace: CraftSupplies1, Suhafuha, My Stash
Flowers: Lavish Laces, CraftSuplies1
Markers
Clear Embossing Powder
Cork Board
Loose Pearls
Pearl Trims: CraftSupplies1
Paper: Couture Shop by Graphic 45


Related Posts Plugin for WordPress, Blogger...